
Overview
Create custom functional hood vents for your Celica by utilizing the existing hood bracing structure. This modification provides both aesthetic enhancement and potential cooling benefits by allowing hot engine bay air to escape. The process involves creating templates from the hood's internal bracing patterns and cutting precision vents that integrate seamlessly with the car's design.
🕒 Time Required: 4 hours
💰 Cost: $30-50 (materials)
🔧 Tools: Jigsaw, drill, template materials, mesh
🚨 Irreversible Modification Warnings
- Permanent modification: Hood cutting cannot be undone - there's no going back
- Skill requirement: Must be comfortable with power tools and precision cutting
- Hood damage risk: Even slight pressure can warp the hood skin permanently
- Safety equipment mandatory: Eye and ear protection required for power tools
- Team work required: Hood removal needs 2-3 people for safety
- Jigsaw technique critical: Blade must stop completely before lifting to prevent damage
Required Tools & Materials
🔧 Tools
- Socket wrench set
- Electric drill with 2mm and 10mm bits
- Jigsaw with metal cutting blades
- Pencil, felt pen, ruler
- Scissors and razor blade
📦 Materials
- A4 paper (2 sheets) and cardboard
- Masking tape
- U-shaped rubber beading
- Decorative mesh or grille material
- Silicone adhesive
- Protective blanket
Installation Steps
Step 1: Access Hood Bracing Structure
Lift the hood and remove the hood lining by taking out all the black plastic retention tabs. This exposes the internal bracing structure underneath. Examine the various shapes created by the bracing - triangular sections toward the front typically provide the best aesthetic results for vent placement.
Step 2: Create Initial Paper Template
Take two sheets of A4 paper and tape them together for size. Place one edge along the straight section of hood skin next to your chosen bracing area. Using your fingernail, carefully rub the paper along the remainder of the bracing to create an impression of the shape. Remove the paper and trace the impression lines with pencil, then cut out with scissors.
Step 3: Transfer to Cardboard Template
Transfer the paper pattern to cardboard for durability. Cut the cardboard using a razor blade rather than scissors to prevent twisting. Test fit the cardboard template in the bracing gap. If it fits properly, measure inward 5-10mm from all three edges and draw new lines with a ruler. Cut along these reduced lines and round off corners for the final template shape.
Step 4: Prepare Hood for Removal
Lower the hood and cover the entire surface with masking tape, ensuring good overlap for protection. Raise the hood again and disconnect the windshield washer hoses. Using a felt pen, trace around the hood hinge brackets to mark their exact position for proper reinstallation alignment.
Step 5: Remove Hood from Vehicle
You will need 2-3 people for this step. Using a socket wrench, remove the four bolts that secure the hood to the vehicle. Have one person on each side and one to remove the hood support rod. Place a protective blanket on a flat surface (front lawn works well) and carefully place the hood with the bracing structure facing up.
Step 6: Position and Mark Template
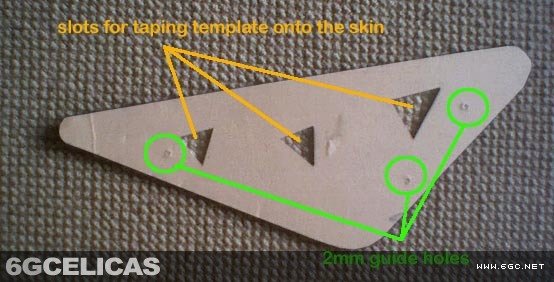
Place your cardboard template into the chosen bracing gap, ensuring 5-10mm clearance from the bracing on all sides. This clearance prevents the jigsaw from catching on the braces during cutting. Measure carefully to ensure even spacing, then tape the template in place. Drill three guide holes through both template and hood: two on one side, one on the other to prevent incorrect orientation during transfer.
Step 7: Mark Hood Surface
Remove the template and repeat positioning on the opposite side if creating matching vents. Flip the hood over to access the painted surface. Align the template using the drilled guide holes and trace around it with felt pen. Repeat for the second vent if desired. You should now have a clear visual of the final result.
Step 8: Cut the Vent Openings
Drill a 10mm starter hole inside each marked triangle for jigsaw blade entry. Insert the jigsaw blade and slowly cut along the marked lines. The reduced template size ensures the blade only cuts the outer skin without hitting the bracing. Make smooth cuts - jigsaws struggle with sharp angles. Stop the blade completely against the hood before lifting to prevent bouncing damage.
Step 9: Install Finishing Materials
Apply U-shaped rubber beading around the cut edges to provide a finished appearance and protect from sharp edges. Secure with silicone adhesive for permanent installation. Install decorative mesh between the hood skin and internal bracing, fixing in place with silicone. Sheet metal shops typically offer better mesh selection than auto parts stores.
Step 10: Reinstall Hood
Once all adhesives have cured, reinstall the hood by reversing the removal process. Use the marked hinge positions to ensure proper alignment. Reconnect windshield washer hoses and test hood operation. Remove masking tape carefully to reveal your custom hood vents.
Expected Results
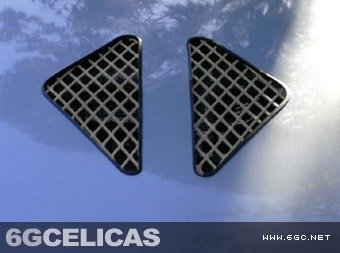
The completed modification provides custom hood vents that appear factory-integrated while utilizing the existing hood structure. The triangular vents follow the natural bracing lines for a cohesive appearance. Beyond aesthetics, the vents provide functional benefit by allowing hot engine bay air to escape, potentially reducing under-hood temperatures during spirited driving.
🌡️ Functionality: Improved engine bay ventilation and heat dissipation
🎯 Uniqueness: One-of-a-kind modification using your car's specific bracing pattern
Additional Reference
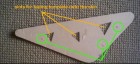
Template Creation Process
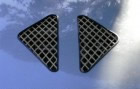
Completed Hood Vents
💡 Pro Tips
- Template Precision: Take extra time with template creation - accuracy here determines the final result quality. Test fit multiple times before cutting.
- Cutting Strategy: Use sharp jigsaw blades and cut slowly for clean edges. Replace blades if they become dull during cutting.
- Mesh Selection: Choose mesh that complements your car's styling. Black powder-coated aluminum provides durability and professional appearance.
- Weather Protection: Ensure all edges are properly sealed with rubber beading to prevent water intrusion and corrosion.
- Planning: Consider the overall balance - if creating two vents, ensure they're symmetrically positioned for best visual impact.