
Overview
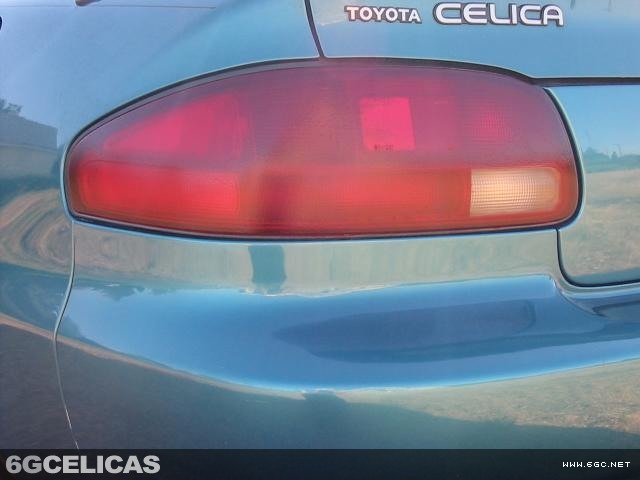
Transform your tail lights to completely red by painting over the amber turn signal sections for a custom, unified appearance. This modification eliminates the factory amber portions using transparent red paint, creating a sleek monochromatic look. The process is applicable to coupe and convertible models, with hatchbacks requiring only the fully amber lens to be painted.
🕒 Time Required: 1 Day (including drying time)
💰 Cost: $25-35 (specialty paints)
🔧 Tools: Transparent paint, masking supplies
🚨 Legal and Safety Considerations
- Legal compliance: Many jurisdictions require amber turn signals - check local regulations before proceeding
- Safety visibility: Red turn signals may be less visible than amber, potentially affecting safety
- Inspection concerns: Modified lighting may cause issues with vehicle inspections
- Insurance implications: Some insurers may consider this a modification affecting coverage
- Reversibility: Paint removal can be difficult and may damage original lens finish
Required Tools & Materials
🔧 Tools
- 10mm socket and ratchet
- Screwdriver set
- Clean workspace area
📦 Materials
- Testors transparent candy apple red spray paint
- Acrylic clear coat spray paint
- Masking tape (high-quality automotive grade)
- Newspaper or masking paper
- Tack cloth or lint-free rags
Installation Steps
Step 1: Remove Tail Light Assemblies
Remove each tail light assembly by accessing the mounting bolts. On coupe/convertible models, remove two 10mm bolts from the plastic back panel of the trunk and one 10mm bolt accessible through the small side panel. Remove all four bulbs by twisting their sockets counterclockwise before removing the complete assembly.
Step 2: Prepare Surface and Mask Reverse Light
Clean the tail light lenses thoroughly to remove any dirt, wax, or contaminants that could affect paint adhesion. Apply masking tape precisely over the reverse light area - this section must remain clear for proper backup light function. For custom designs, create patterns with the masking tape to allow selective light transmission.
Step 3: Mask Surrounding Areas
Use newspaper and masking tape to protect all areas around the lenses that should not receive paint. Cover the entire housing except for the amber sections to be painted. Ensure complete coverage as overspray can be difficult to remove from plastic housing components.
Step 4: Apply Transparent Red Paint
Apply Testors transparent candy apple red paint in very thin, even coats. Allow 20-30 minutes drying time between each coat to prevent runs and achieve proper transparency. Apply approximately four coats for optimal color depth and coverage. Work in a dust-free environment to prevent contamination.
Step 5: Remove Reverse Light Masking
Once the red paint has become fairly dry but before applying clear coat, carefully remove the masking tape from the reverse light area. Remove tape while paint is still slightly tacky to prevent peeling of the red paint along tape edges. Clean any paint residue from the reverse light area immediately.
Step 6: Apply Clear Coat Protection
Apply acrylic clear coat in thin, even coats to protect the red paint and maintain gloss finish. Use the same timing as with the red paint - 20-30 minutes between coats. Apply approximately four clear coats for maximum durability and UV protection. Maintain consistent spray technique for even coverage.
Step 7: Cure and Final Preparation
Allow the clear coat to dry for a full 24 hours before handling or installation. This curing time ensures maximum durability and prevents damage during handling. Once fully cured, carefully remove all remaining masking tape and newspaper, taking care not to scratch the new finish.
Step 8: Reinstall and Test
Reinstall the tail light assemblies by reversing the removal process. Reconnect all bulbs and electrical connections, then test all lighting functions including brake lights, turn signals, and reverse lights. Verify proper operation before regular driving to ensure safety and legal compliance.
Expected Results
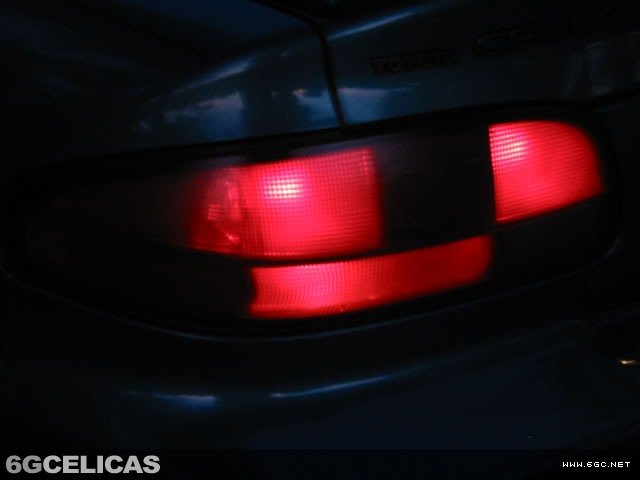
The completed modification provides a uniform red appearance across the entire tail light assembly, eliminating the factory amber turn signal sections. The transparent paint maintains the original lens texture while providing the desired color change. When illuminated, the turn signals will now show red instead of amber, creating a cohesive monochromatic look.
🎨 Customization: Maintains original lens texture and clarity
💡 Functionality: All lighting functions remain operational
💡 Pro Tips
- Paint Quality: Use only high-quality transparent automotive paints designed for plastics - cheaper alternatives may yellow or fade quickly.
- Environmental Conditions: Paint in temperatures between 65-75°F with low humidity for best results and proper curing.
- Thin Coats: Multiple thin coats provide better coverage and durability than fewer thick coats that may run or sag.
- Masking Precision: Use automotive-grade masking tape that removes cleanly without leaving residue or damaging the finish.
- Legal Research: Check local vehicle lighting laws before proceeding - some areas strictly require amber turn signals for safety compliance.