
>>>>>>A DIY FOR REPLACING YOUR DRIVER SIDE CV AXLE on a GT>>>>>>
>>>> (I am not a mechanic so used this guide at your own risk!) The reason why I changed my CV axle is because the boot was ripped and it made a loud clicking noise on small turns. This was done on a 1995 GT Convertible and it took me about 3 hours to do. Good luck, and I hope this helps! >>>>
>>>>>>TOOLS & PARTS LIST>>>>>>
>>>>
- jack + jack tools
- wheel block
- jack stand
- 1/2 ratchet + extension
- 3/8 ratchet + extension
- torque wrench
- 14mm, 17mm, 24mm, 30mm socket
- gloves
- gear oil (SAE 75W-90; 2.6 litres:2.7 US qts)
- cv axle (i'll get the toyota part number later because i used a aftermarket axle)
- transmission seal (90311-35019)
- Toyota manual
- hammer (rubber preferred)
- smally pry bar
- pliers
- two prong puller removal tool
- 5mm allen key
- 2 medium sizer cotter pins
- towel>>>>
- *a friend to help you
>>>>>>SETUP & PREPARATION>>>>>>
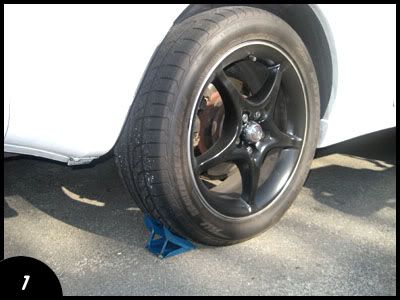
>>>>1. setup a wheel blocker (actually wheel blocker or a nice 2x4 is fine)
2. loosen wheel lug nuts with a 21mm socket
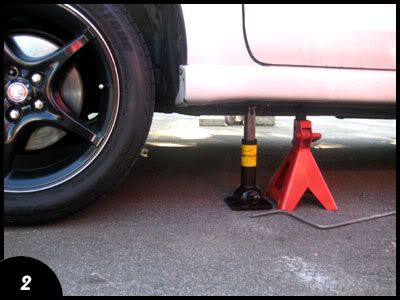
3. raise car with jack, and place a jack stand under the car for safety reasons
*if you have a convertible you should unlatch your top to avoid any extra pressure that happens from jacking up your car*
4. remove lug nuts and than the wheel>>>>
>>>>>>REMOVAL>>>>>>
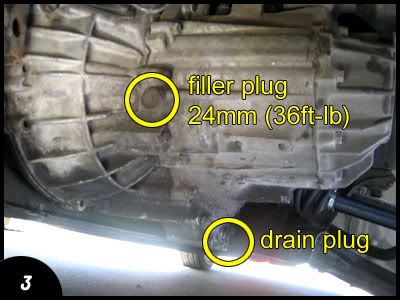
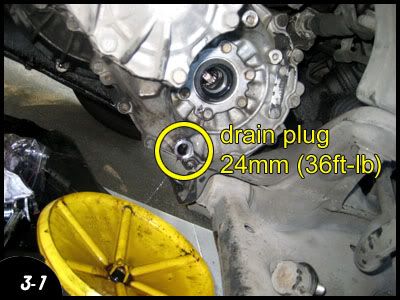
>>>> 5. remove transmission drain plug with a 24mm socket and drain the fluid out
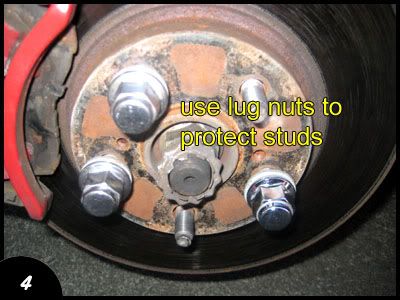
6. use your lug nuts to protect your wheel studs
7. remove cotter pin with side cutters or pliers and than lock cap
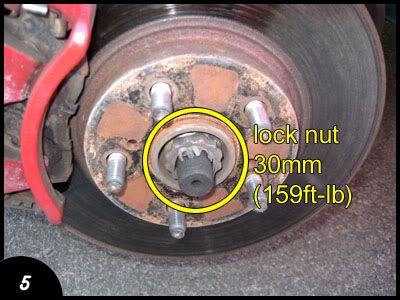
8. loosen the bearing lock nut
* I had my friend step on the brakes as i was removing the nut. I was using a 30mm socket on a 1/2 ratchet, i position the ratchet up straight and just whacked it with a rubber mallet
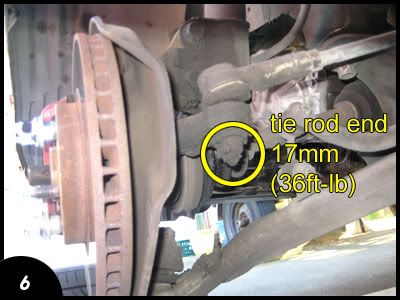
9. remove cotter pin than remove tie rod end nut from steering knuckle
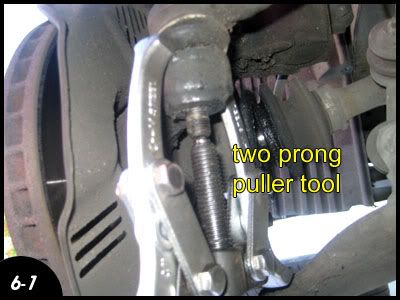
*using a two prong pulley removal tool I held onto the sides past the ball joints and spun the tool upwards to push out the tie rod end (picture 6-1)
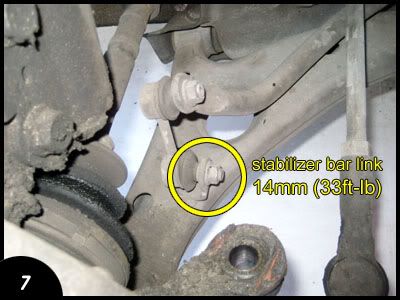
10. remove stabilizer bar link from lower suspension arm
* I was able to remove the the lower one because mine is shot. I ended up removing the top one instead
* I did not know this but, to remove the nut you need to first loosen the nut and than put a 5mm Allen key inside the stud to help prevent it from turning and than you remove the nut (thanks to Coomer's DIY)
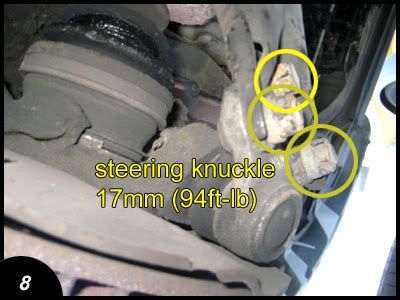
12. removing the lower ball joints nuts and bolt from the steering knuckle, remove the lock bearing nut and move the assembly to the right to have better access to the CV axle
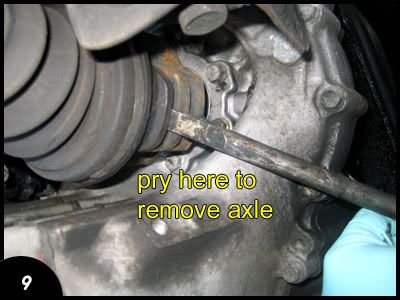
13. remove CV axle
* The manual shows this is the area where your suppose to pry the CV axle to remove it. Unfortunately I wasn't able to remove it the axle with their method. I ended up prying behind the dust cover it will damage the dust cover and seal but those were going to be replaced so it didn't matter to me.
*next remove the seal >>>>
>>>>>>INSTALLATION>>>>>>
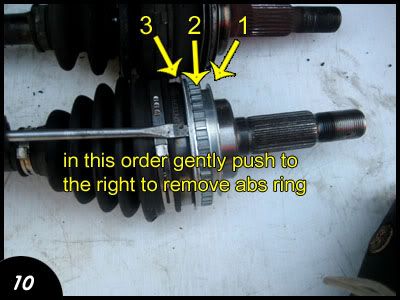
>>>> 13. I dont have abs on my car so i had to remove the abs ring prior to installation (ABS RING CAN BE LEFT ON FOR INSTALLATION FOR NON ABS CELICAs)
*remember to replace the dust cover once you remove the abs ring (I used the same dust ring on the original CV because it was much stronger)
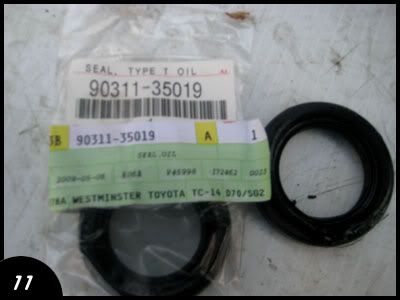
15. install new transmission seal (make sure it sits flush or just a little bit deeper, and make sure you dont twist the bead inside or else it will leak!)
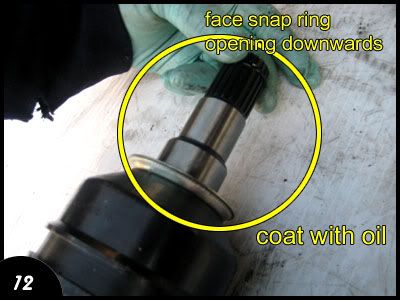
16. coat gear oil to the inboard joint tulip and differential case sliding surface
17. set the snap ring opening side facing downwards when installing the CV axle
18. install lower ball joints nuts and bolt (94ft-lbs)
19. install stabilizer bar link nut (14ft-lbs)
* use can jack up your lower control arm up a bit to help make this easier to install
20. tie rod end nut (36ft-lbs), than install new cotter pin
21. install bearing lock nut (159ft-lbs), than lock and new cotter pin
* same procedure as the removal, I used my friend to hold down the brakes
22. fill up your transmission fluid through the fill plug (75w-90; 2.6 litres: 2.7 US qts) (36ft-lbs)
23. take your car for a 5 min drive with lots of slow turns, check if it still clicking or any weird noises. It everything sounds good park it, and check for transmission seal leak. If that's not leaking YOUR ARE GOOD TO GO!
>>>>
>>>>>>CONGRATULATIONS! YOU JUST DID A CV AXLE REPLACEMENT!!! and you also did these along the way: transmission fluid drain and fill and a transmission seal lol>>>>>>
>>>>>>FUNNY SIDE NOTES: >>>>>>
>>>>
1. I was using Royal Purple in my transmission, I tried to remove the axle hoping that not a lot of the fluid would come out. In the end a lot came out and I ended up changing the fluid. The fluid cost 50 dollars for 3 litres. I had the Purple Royal for less than a year.
2. This time I used regular 75w-90. My opinion on Royal Purple is that it is a big waste of money because I had bought it originally to help with my 3rd gear grind. It stopped for a bit and eventually came back. Its funny because this regular gear oil has almost stopped the grind (i can shift into 3rd A LOT easier now)
3. This DIY took just as long to write and post as to changing my CV axle
>>>>
This post has been edited by vile_v: Feb 28, 2010 - 1:24 AM
>>>> (I am not a mechanic so used this guide at your own risk!) The reason why I changed my CV axle is because the boot was ripped and it made a loud clicking noise on small turns. This was done on a 1995 GT Convertible and it took me about 3 hours to do. Good luck, and I hope this helps! >>>>
>>>>>>TOOLS & PARTS LIST>>>>>>
>>>>
- jack + jack tools
- wheel block
- jack stand
- 1/2 ratchet + extension
- 3/8 ratchet + extension
- torque wrench
- 14mm, 17mm, 24mm, 30mm socket
- gloves
- gear oil (SAE 75W-90; 2.6 litres:2.7 US qts)
- cv axle (i'll get the toyota part number later because i used a aftermarket axle)
- transmission seal (90311-35019)
- Toyota manual
- hammer (rubber preferred)
- smally pry bar
- pliers
- two prong puller removal tool
- 5mm allen key
- 2 medium sizer cotter pins
- towel>>>>
- *a friend to help you
>>>>>>SETUP & PREPARATION>>>>>>
>>>>1. setup a wheel blocker (actually wheel blocker or a nice 2x4 is fine)
2. loosen wheel lug nuts with a 21mm socket
3. raise car with jack, and place a jack stand under the car for safety reasons
*if you have a convertible you should unlatch your top to avoid any extra pressure that happens from jacking up your car*
4. remove lug nuts and than the wheel>>>>
>>>>>>REMOVAL>>>>>>
>>>> 5. remove transmission drain plug with a 24mm socket and drain the fluid out
6. use your lug nuts to protect your wheel studs
7. remove cotter pin with side cutters or pliers and than lock cap
8. loosen the bearing lock nut
* I had my friend step on the brakes as i was removing the nut. I was using a 30mm socket on a 1/2 ratchet, i position the ratchet up straight and just whacked it with a rubber mallet
9. remove cotter pin than remove tie rod end nut from steering knuckle
*using a two prong pulley removal tool I held onto the sides past the ball joints and spun the tool upwards to push out the tie rod end (picture 6-1)
10. remove stabilizer bar link from lower suspension arm
* I was able to remove the the lower one because mine is shot. I ended up removing the top one instead
* I did not know this but, to remove the nut you need to first loosen the nut and than put a 5mm Allen key inside the stud to help prevent it from turning and than you remove the nut (thanks to Coomer's DIY)
12. removing the lower ball joints nuts and bolt from the steering knuckle, remove the lock bearing nut and move the assembly to the right to have better access to the CV axle
13. remove CV axle
* The manual shows this is the area where your suppose to pry the CV axle to remove it. Unfortunately I wasn't able to remove it the axle with their method. I ended up prying behind the dust cover it will damage the dust cover and seal but those were going to be replaced so it didn't matter to me.
*next remove the seal >>>>
>>>>>>INSTALLATION>>>>>>
>>>> 13. I dont have abs on my car so i had to remove the abs ring prior to installation (ABS RING CAN BE LEFT ON FOR INSTALLATION FOR NON ABS CELICAs)
*remember to replace the dust cover once you remove the abs ring (I used the same dust ring on the original CV because it was much stronger)
15. install new transmission seal (make sure it sits flush or just a little bit deeper, and make sure you dont twist the bead inside or else it will leak!)
16. coat gear oil to the inboard joint tulip and differential case sliding surface
17. set the snap ring opening side facing downwards when installing the CV axle
18. install lower ball joints nuts and bolt (94ft-lbs)
19. install stabilizer bar link nut (14ft-lbs)
* use can jack up your lower control arm up a bit to help make this easier to install
20. tie rod end nut (36ft-lbs), than install new cotter pin
21. install bearing lock nut (159ft-lbs), than lock and new cotter pin
* same procedure as the removal, I used my friend to hold down the brakes
22. fill up your transmission fluid through the fill plug (75w-90; 2.6 litres: 2.7 US qts) (36ft-lbs)
23. take your car for a 5 min drive with lots of slow turns, check if it still clicking or any weird noises. It everything sounds good park it, and check for transmission seal leak. If that's not leaking YOUR ARE GOOD TO GO!
>>>>
>>>>>>CONGRATULATIONS! YOU JUST DID A CV AXLE REPLACEMENT!!! and you also did these along the way: transmission fluid drain and fill and a transmission seal lol>>>>>>
>>>>>>FUNNY SIDE NOTES: >>>>>>
>>>>
1. I was using Royal Purple in my transmission, I tried to remove the axle hoping that not a lot of the fluid would come out. In the end a lot came out and I ended up changing the fluid. The fluid cost 50 dollars for 3 litres. I had the Purple Royal for less than a year.
2. This time I used regular 75w-90. My opinion on Royal Purple is that it is a big waste of money because I had bought it originally to help with my 3rd gear grind. It stopped for a bit and eventually came back. Its funny because this regular gear oil has almost stopped the grind
(i can shift into 3rd A LOT easier now)3. This DIY took just as long to write and post as to changing my CV axle
>>>>
This post has been edited by vile_v: Feb 28, 2010 - 1:24 AM

