Over 1M Posts • 84K Topics • 9K Authors

jordisonjr's photography/progress thread - 6G Celicas Forums

Topic #74256 287 posts Started by jordisonjr
Got the side skirts all mounted up yesturday evening.
I'll have to admit I was a little hesitant to drill 3/8" holes in each side of car, but once I had the first side taken care of, and realized that everything was going to line up correctly, it wasn't that big of a deal.

It took inbetween 3-4 hours to install, as for the first side, i checked everything 4 times, as I didn't want to make a mistake with drilling holes, and being hooped with a bunch of holes in the wrong spots. Big thanks to the EXCELLENT How to in the Sticky for walking me through, although my install went slightly different than describes, but for the most part was the same.

Overall I'm impressed with how the paint matched. The two way tape I used doesn't seem to have worked the greatest, as there is a small gap on the passenger side (I think due to a bent clip, ill probably fix that down the road), and a couple parts were already starting to pull off this morning, but no biggy. I may opt for a more permanent solution, depending if they pull off anymore, but I'll see how that goes.

Anyone else have some tips on what they've used instead of the two way tape? Or a different brand/method that works better than the 3M stuff?

Now, enough yackin' on to the pics!
(Please excuse my filthy car, I got caught in a ran storm yesturday morning and didn't have time to wash it)
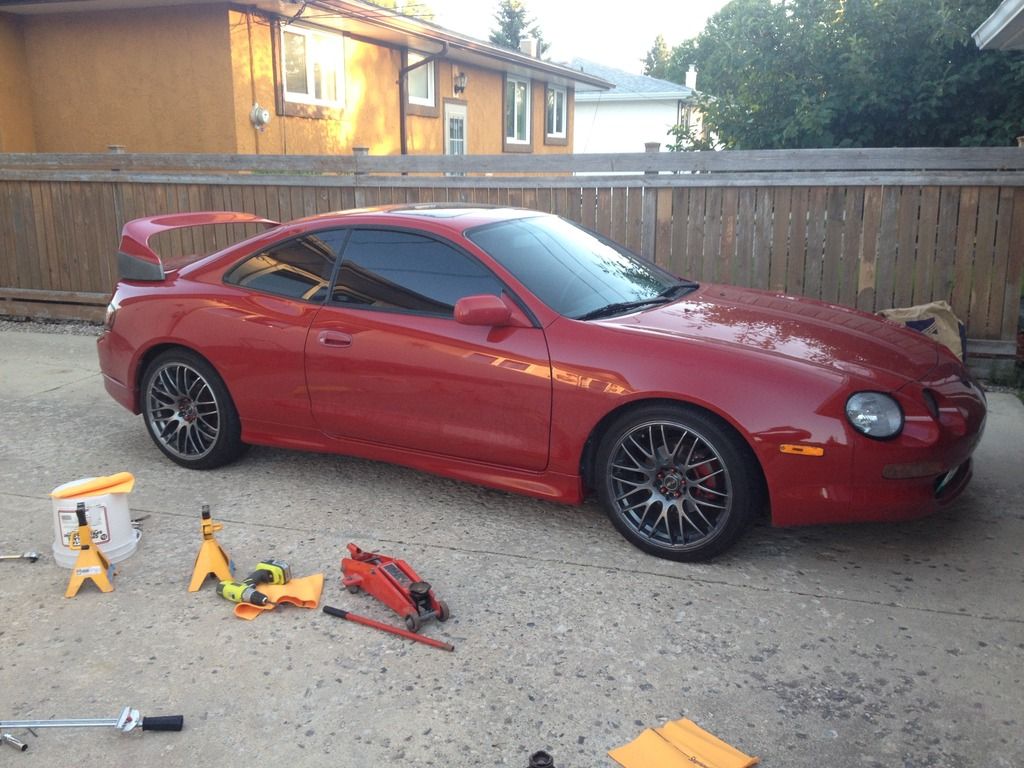
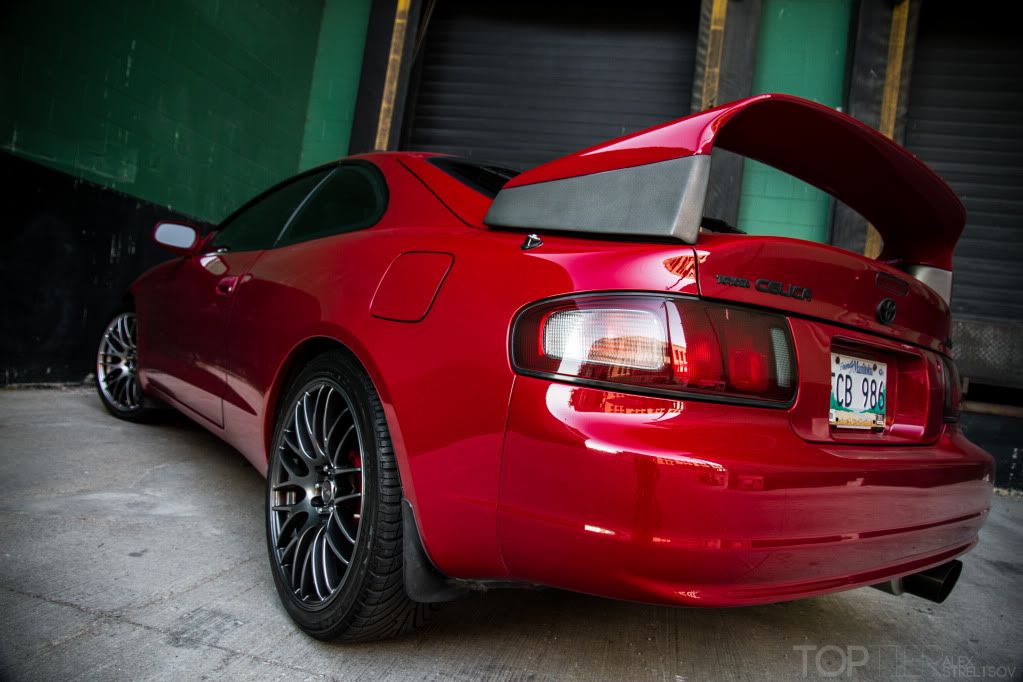
Passenger side:

Driver side right after installing:

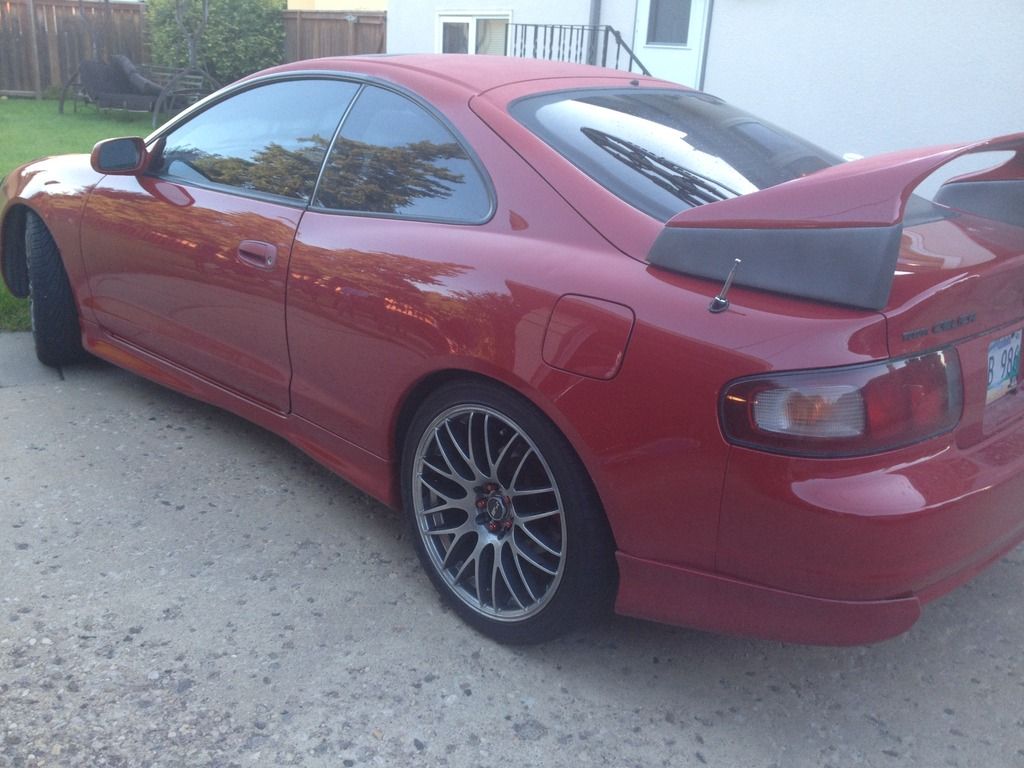
And driver side this morning:


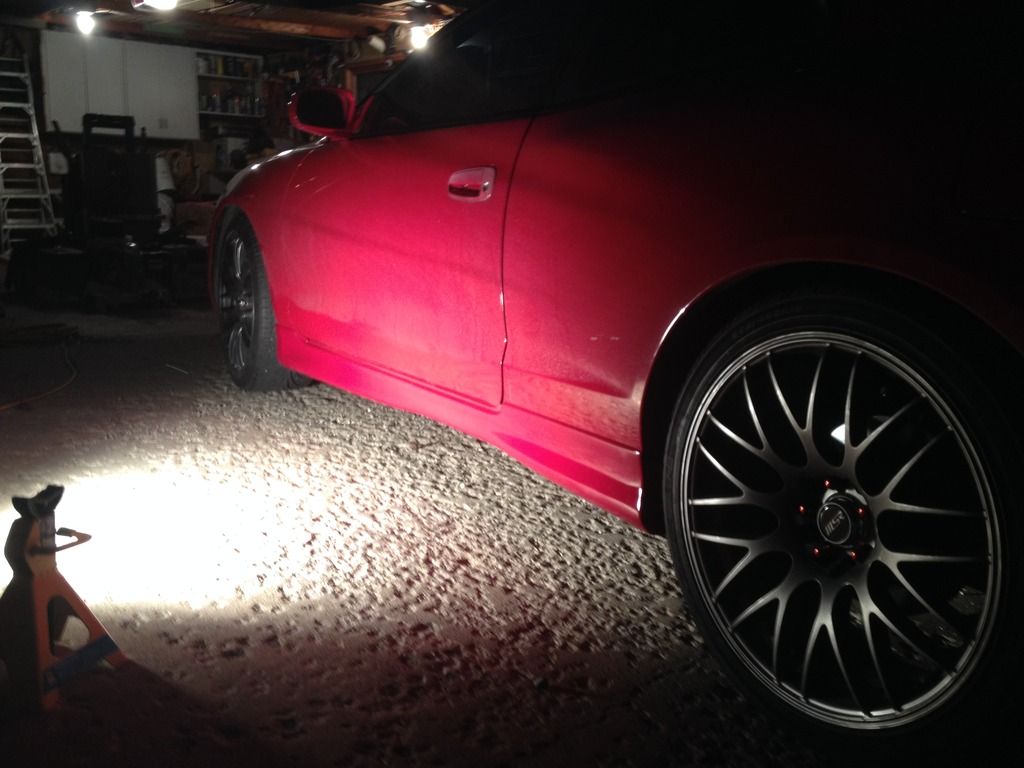
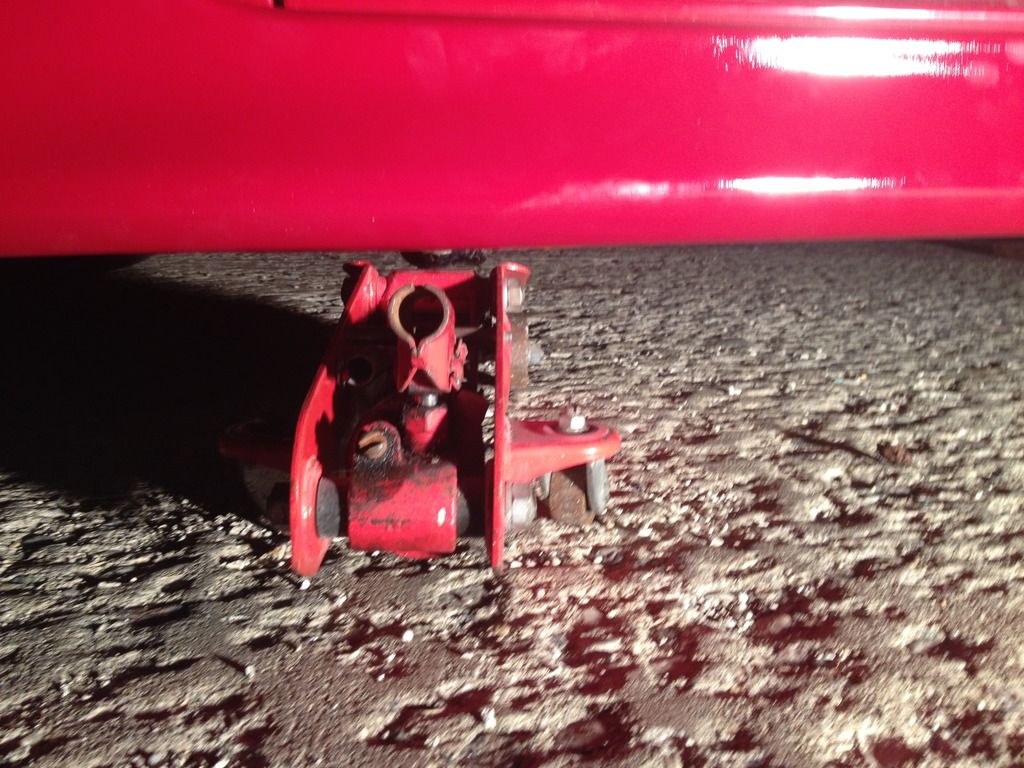
Im glad there's still enough clearance to get my jack under the car as well. It would have been a pain if the skirts hung down just enough to not be able to fit it:


Still trying to source out a set of front SS-III Splitters, preferably OEM, or reps that have a decent fitment, if anyone has any leads wink.gif

This post has been edited by jordisonjr: Sep 1, 2015 - 8:32 AM

-Protection mode, For when your amp tries to blow its load.1995 Toyota Celica GTS-Daily Driver1999 Chevy Cavalier-Winter Beater1994 Honda Civic CX Hatchback-DeadMy Celica!
skirts look great! thumbsup.gif thumbsup.gif

and I can't remember the last time I used a normal jack like that. I got a low profile racing jack and the other one's just been collecting dust in my garage. hahaha.

*1997 Celica ST - 3SGE Greytop BEAMS*1977 Celica RA29 - Classic Cruiser*2005 Matrix AWD - dedded but still hanging around like a ghost2019 Rav4 XLE Premium - Sports mode is fun.
>
QUOTE (cheela @ Sep 1, 2015 - 8:46 AM) *
>skirts look great! thumbsup.gif thumbsup.gif

and I can't remember the last time I used a normal jack like that. I got a low profile racing jack and the other one's just been collecting dust in my garage. hahaha.

Yea its suuuper old.
I have a newer one, but in order to use it in the front, I need to jack this one up about 1/4", and then use the newer one. But I had both sides in the air so i was able to use both.
Just glad I don't need to get yet another new one laugh.gif

-Protection mode, For when your amp tries to blow its load.1995 Toyota Celica GTS-Daily Driver1999 Chevy Cavalier-Winter Beater1994 Honda Civic CX Hatchback-DeadMy Celica!
Yay skirts! 3M makes a tape that's kind of foamy, seems to work better for stuff like that,

2001 Miata LS 5-speed
Other than double sided tape, you could try using an adhesive sealer like Sika for a more permanent solution. Try talking to RoadRage, I think that's what he used on his.

2007 Impreza 2.5i - Daily1994 Camry - Sold1994 Celica - Sold :(Click hereto see my progress thread!
>
QUOTE (PegGTS @ Sep 1, 2015 - 11:25 AM) *
>Other than double sided tape, you could try using an adhesive sealer like Sika for a more permanent solution. Try talking to RoadRage, I think that's what he used on his.

Ill have to do that. My dad also mentioned something called butyl tape that may work as well.
I may look into that.

-Protection mode, For when your amp tries to blow its load.1995 Toyota Celica GTS-Daily Driver1999 Chevy Cavalier-Winter Beater1994 Honda Civic CX Hatchback-DeadMy Celica!
I haven't really posted any proper photos since the sideskirts install. So here's a couple.


This post has been edited by jordisonjr: Sep 9, 2015 - 10:20 AM

-Protection mode, For when your amp tries to blow its load.1995 Toyota Celica GTS-Daily Driver1999 Chevy Cavalier-Winter Beater1994 Honda Civic CX Hatchback-DeadMy Celica!

Your car is one of the few that I've liked without side skirts..... But it looks even better now!!! biggrin.gif

SOLD :( 1997 ST204 Celica ZR ----->See it here on 6GC!2013 October Celica of the Month XDNow: '00 NB8B Mazda MX5 ----->See it here in off topic!
>
QUOTE (JoshuaM @ Sep 9, 2015 - 11:27 AM) *
>Your car is one of the few that I've liked without side skirts..... But it looks even better now!!! biggrin.gif

Haha really?
I've always thought it sat too high without side skirts, although 18's didn't really help that.
But when I bought wheels I didn't think it would take 5+ years to find TRD sideskirts.
Little did I know, i'd have to settle for OEM laugh.gif

-Protection mode, For when your amp tries to blow its load.1995 Toyota Celica GTS-Daily Driver1999 Chevy Cavalier-Winter Beater1994 Honda Civic CX Hatchback-DeadMy Celica!
>
QUOTE (jordisonjr @ Sep 9, 2015 - 11:06 AM) *
>>
QUOTE (JoshuaM @ Sep 9, 2015 - 11:27 AM) *
>Your car is one of the few that I've liked without side skirts..... But it looks even better now!!! biggrin.gif

Haha really?
I've always thought it sat too high without side skirts, although 18's didn't really help that.
But when I bought wheels I didn't think it would take 5+ years to find TRD sideskirts.
Little did I know, i'd have to settle for OEM laugh.gif


Yeah, it has never looked as low as it actually is, but you get a bit of the rally look with the spoiler and the car always looks really clean and well done. The fact that you always have nice photos also helps tongue.gif

SOLD :( 1997 ST204 Celica ZR ----->See it here on 6GC!2013 October Celica of the Month XDNow: '00 NB8B Mazda MX5 ----->See it here in off topic!
I will have to agree with Joshua, yours was one of the cars I didn't mind that sat the way it did with no sideskirts. but now that you got the skirts...... a drop is in need. hahha wink.gif

*1997 Celica ST - 3SGE Greytop BEAMS*1977 Celica RA29 - Classic Cruiser*2005 Matrix AWD - dedded but still hanging around like a ghost2019 Rav4 XLE Premium - Sports mode is fun.
>
QUOTE (cheela @ Sep 10, 2015 - 9:38 AM) *
>I will have to agree with Joshua, yours was one of the cars I didn't mind that sat the way it did with no sideskirts. but now that you got the skirts...... a drop is in need. hahha wink.gif

Damnit, of course.
FS: OEM 3L2 Skirts laugh.gif

Front Splitters are at the top of the list right now.

-Protection mode, For when your amp tries to blow its load.1995 Toyota Celica GTS-Daily Driver1999 Chevy Cavalier-Winter Beater1994 Honda Civic CX Hatchback-DeadMy Celica!
>
QUOTE (Nial @ Sep 18, 2015 - 12:47 AM) *

Thanks for the heads up.
But I actually have a set on the way! biggrin.gif

-Protection mode, For when your amp tries to blow its load.1995 Toyota Celica GTS-Daily Driver1999 Chevy Cavalier-Winter Beater1994 Honda Civic CX Hatchback-DeadMy Celica!
Well after mounting my sideskirts the first time around, I wasn't really happy with how well the 3M tape held on.
In some spots it was pulling off the car but not the skirt, and in some sections off the skirt but not the car. There's a small gap that I don't mind, but when you can see the tape where the gap is, it looks pretty brutal in my opinion.

After posting on the facebook page and talking with some friends, I pulled off the driver side, and cleaned both surfaces with Isypropl rubbing alcohol 70% and remounted. So far it seems to be holding up well, and that was from sunday. If it still looks good by the weekend, I'm going to go ahead and redo the passenger side as well, as that one had a larger gap than the driver side originally did.

Also, Got a text from my sister while I'm at work with this:


Any guesses? biggrin.gif

This post has been edited by jordisonjr: Sep 22, 2015 - 12:19 PM

-Protection mode, For when your amp tries to blow its load.1995 Toyota Celica GTS-Daily Driver1999 Chevy Cavalier-Winter Beater1994 Honda Civic CX Hatchback-DeadMy Celica!
Hmmm...SS-III front splitters?? biggrin.gif

This post has been edited by CelicaDICE: Sep 22, 2015 - 1:54 PM

Rare JDM Dealer Option Parking(Proximitiy) Senor for salehttp://www.6gc.net/forums/index.php?showtopic=97051
>
QUOTE (CelicaDICE @ Sep 22, 2015 - 1:48 PM) *
>Hmmm...SS-III front splitters?? biggrin.gif

Damn right biggrin.gif

-Protection mode, For when your amp tries to blow its load.1995 Toyota Celica GTS-Daily Driver1999 Chevy Cavalier-Winter Beater1994 Honda Civic CX Hatchback-DeadMy Celica!
WHOOO! about time! hahaha

*1997 Celica ST - 3SGE Greytop BEAMS*1977 Celica RA29 - Classic Cruiser*2005 Matrix AWD - dedded but still hanging around like a ghost2019 Rav4 XLE Premium - Sports mode is fun.
>
QUOTE (cheela @ Sep 22, 2015 - 3:03 PM) *
>WHOOO! about time! hahaha

Bit the bullet and bought some reps.
Although, a set of OEM Front and Rears came up on ebay like the day after rolleyes.gif

-Protection mode, For when your amp tries to blow its load.1995 Toyota Celica GTS-Daily Driver1999 Chevy Cavalier-Winter Beater1994 Honda Civic CX Hatchback-DeadMy Celica!
yup. always works that way.

*1997 Celica ST - 3SGE Greytop BEAMS*1977 Celica RA29 - Classic Cruiser*2005 Matrix AWD - dedded but still hanging around like a ghost2019 Rav4 XLE Premium - Sports mode is fun.
Did a bit of a "test fit" by placing them up against the front bumper ( laugh.gif ) and it looks like the fitment will be pretty good. Although I won't really know until I actually bolt them on from the bottom. I didn't get a chance to do that last night as I still need to drill holes in the splitter to mount them, which I plant to get to tonight.

I also hope to start prepping so I can get them painted before the cooler weather hits. I ended up going with the Replicas from paul in Poland after looking for about 2-3 weeks without any luck on finding OEM, or even other reps for that matter. I think these should do just fine.


This post has been edited by jordisonjr: Sep 23, 2015 - 8:21 AM

-Protection mode, For when your amp tries to blow its load.1995 Toyota Celica GTS-Daily Driver1999 Chevy Cavalier-Winter Beater1994 Honda Civic CX Hatchback-DeadMy Celica!
I managed to get some holes drilled in the splitters last night, and tossed them on the car just to see how the fitment was. Well, its not great. I'm not sure if its cause they're replicas, or if its because they aren't meant for the preface bumper, or both.

Below is a picture of the driver side, as well as both sides mounted up. Keep in mind this is with one bolt each, and zip ties in the rest of the holes, and no tape. I think I should be able to get the gap closed up a bit better, but not sure how much more.


Driver side from above:


Passenger side from above:


As you can see, the fitment isn't anywhere near perfect. I'm debating what I want to do. I don't mind the gap, if you can see through to the ground. I was thinking I could fill the gap with a foam of some sort, that could stick to the splitter, and then just touch the front bumper.

Or, I could use fiberglass and make a flat portion along the top of the splitter, that goes perpendicular to the ground, and contacts the fender/bumper, and just trim it accordingly untill it fits proper. Although, I'm not sure how well my fiberglass skills would be to be able to pull this off, as I've only used it once, and it was to repair the crack in the rear splitter.

Any other suggestions/opinion?
Do people running OEM splitters have this gap as well, before applying the tape? I know the OEM are much more flexible than the Fiberglass ones are.

This post has been edited by jordisonjr: Sep 24, 2015 - 10:00 AM

-Protection mode, For when your amp tries to blow its load.1995 Toyota Celica GTS-Daily Driver1999 Chevy Cavalier-Winter Beater1994 Honda Civic CX Hatchback-DeadMy Celica!
I've got OEM on pre-face and from memory I had a very tiny gap, not that big, Double sided tape fixed it for me..

try to see if tape manages to flex it enough to have no gap first, before any fibreglass attempts

1994 ST204 TTEClick to see my progress thread :)
>
QUOTE (RoadRage @ Sep 25, 2015 - 2:35 AM) *
>I've got OEM on pre-face and from memory I had a very tiny gap, not that big, Double sided tape fixed it for me..

try to see if tape manages to flex it enough to have no gap first, before any fibreglass attempts

Yea I met up with PEG GTS (Paul) last night, and realized that the OEM ones also have a similar gap, but the material i what makes the difference as the OEM ones are able to flex enough to fit with tape, where as the Reps may not be.

Yesturday I did some more test fitting, to see if I wanted to keep these, or try and sell them to replace with some OEM ones. I did some sanding around the corner that wraps around the wheel well, and the flat section on the fender near the wheel well. And managed to significantly reduce the gap. I'm hoping this will be enough so that the 3M tape will be able to hold it in place. Although, the reps, unlike the OEM, do not have the flat lip that contacts the body, where you would mount the tape. So I'm a little concerned if the tape will have anything to grab on to.

I think tonight I'm going to try and mount it with a couple pieces of tape, to see if there is enough surface area to grab. If not, I may just fiberglass a small lip on the inside of the splitter, so it has something to grab onto. All this for reps that were "perfect fitment" kindasad.gif I realize they are reps, and they weren't going to fit 100%, but I was hoping for a little better fitment than this.

-Protection mode, For when your amp tries to blow its load.1995 Toyota Celica GTS-Daily Driver1999 Chevy Cavalier-Winter Beater1994 Honda Civic CX Hatchback-DeadMy Celica!
Yeah they didn't seem to be very flexible at all. But I think if you use that 3M adhesion promoter or running alcohol like you used on the skirts on both the splitters and the fender/bumper the double sided tape should hold them on. Could try that out before painting them just to be sure they do stay on.

This post has been edited by PegGTS: Sep 25, 2015 - 11:34 AM

2007 Impreza 2.5i - Daily1994 Camry - Sold1994 Celica - Sold :(Click hereto see my progress thread!
I spent thursday and friday evening doing what I could to make these splitters fit better. I realized that there was a flat spot just in front of the wheel well on the fender, that hadn't really been accounted for in the shape of the splitter, and that if I sanded this out, it would suck the splitter in closer to the body. I also re shaped the lip that wraps inside the fender, to allow the rest of it to come close to the fender/bumper.

Once I had these fitting as I wanted to, I went straight to it, and shot some primer on friday night. Saturday, I got right to painting in the morning, and was able to get them cleared by mid after noon. In between shooting coats of paint, I went a re-mounted my passenger side skirt as there was an atrocious gap that I wasn't really happy with. 2 of the mounting tabs on the inside of the skirt, where the plastic pegs were removed, had miss shaped the skirt, and didn't allow it to completely contact the body, causing the gap. So I cut these out, and now the skirt fits flawlessly and has 0 gap whatsoever, so I couldn't be happier with the fitment now. But I unfortunately don't have pictures of these.

Back to the spliters, I hadn't originally planned ot get them on this weekend, but last night I had some extra time, so I tossed them on, and it didn't even take too long. I'm stoked on how they look.

Here's the gap on the Driver side splitter from above. Fitment isn't perfect, as you can see right around the wheel well, but not a huge concern in my opinion:


And now the passenger side. This one had the worst fitment from the start, and a gap way larger than this, as you can see posted above. It looks a little worse in this shot, because its the perfect angle to see the gap, but this is what I was able to bring it down to:


I tried using the two way tape and rubbing alcohol to clean the surfaces, but it didn't really want to stick very long, due to the fiberglass being fairly rigid and inflexible. But from a distance, it really isn't that noticeable(ignore the dirty car, and driveway shots):


Overall, I'm happy with how I managed to get them to fit, considering how poorly they fit from the start. Although if I did it again, I would probably just go with OEM. I just wanted these on before the end of the summer.

Also on friday, I ended up re-tinting my front turns and side markers, as it was really faded before. They're fairly dark, but the light passes through still, and you can even see the reflector through the side marker (required in Winnipeg) when light hits it. Some may think its a "ricer mod" but it'll do for now, untill I can get clear turns in there.


-Protection mode, For when your amp tries to blow its load.1995 Toyota Celica GTS-Daily Driver1999 Chevy Cavalier-Winter Beater1994 Honda Civic CX Hatchback-DeadMy Celica!
the tint matches the rest of your car, windows and riser blocks.
and sucks about fitment but it looks good though.

*1997 Celica ST - 3SGE Greytop BEAMS*1977 Celica RA29 - Classic Cruiser*2005 Matrix AWD - dedded but still hanging around like a ghost2019 Rav4 XLE Premium - Sports mode is fun.
>
QUOTE (cheela @ Sep 28, 2015 - 11:10 AM) *
>the tint matches the rest of your car, windows and riser blocks.
and sucks about fitment but it looks good though.

That was my original plan when I had did it the first time.
It just got reaaaally faded so I decided to re-spray them
A buddy recommended that I do the front grill black as well, which I think I'm going to tackle tonight.

-Protection mode, For when your amp tries to blow its load.1995 Toyota Celica GTS-Daily Driver1999 Chevy Cavalier-Winter Beater1994 Honda Civic CX Hatchback-DeadMy Celica!
Looks neat!

Is that just clear and thats it, or did you buff after?
I was talking to Paul a few days before about here in Aus, the clear I get here sprays on hazy and have to super sand it and buff it to come out looking that shiny

1994 ST204 TTEClick to see my progress thread :)
>
QUOTE (RoadRage @ Sep 28, 2015 - 8:44 PM) *
>Looks neat!

Is that just clear and thats it, or did you buff after?
I was talking to Paul a few days before about here in Aus, the clear I get here sprays on hazy and have to super sand it and buff it to come out looking that shiny

That's just clear coat.
The haziness you get may have something to do with humidity/temperature/ambient air. When I was clear coating my sideskirts, I sprayed on a hot humid day, and it came out milky/hazy. I solved it by wetsanding with 600 grit (I think it was 600, but I could double check if you need) and then resprayed clear over top on a less humid day, and they cam eout much better.

It also could have something to do with the actual clearcoat you've used, it may be poor quality. I've used duplicolor clear in the past, and I had that issue no matter what I did, so this time around I got my supplies from an actual paint supply store, rather than a hardware store that happens to sell paint and other materials.

I could go back and wetsand these with a 1000-1200 grit, to have even more shine, but I think I'm happy with the overall look, and don't want to damage the surrounding areas, or remove them from the car, so I'll probably just leave them as is.

-Protection mode, For when your amp tries to blow its load.1995 Toyota Celica GTS-Daily Driver1999 Chevy Cavalier-Winter Beater1994 Honda Civic CX Hatchback-DeadMy Celica!