
I say keep it at that ride height, then put some all-terrain tires on. And live that rally life. After all you will be doing an AWD conversion right?
Enders swap - 6G Celicas Forums
>
One day yes. The only thing standing in my way is a quality welder and 3 welding courses.
QUOTE (navseal345 @ Nov 4, 2014 - 11:59 PM) 
>I say keep it at that ride height, then put some all-terrain tires on. And live that rally life. After all you will be doing an AWD conversion right?
One day yes. The only thing standing in my way is a quality welder and 3 welding courses.
Hello 6gc,
decided to take a few last pictures of the white celica before I put it into storage for the winter:


Oh yea, almost forgot. This happened:

The swap is done, my body is wrecked, but the beast is revived
I took things a lot slower with the swap this time. It took 4 days instead of the usual 2; but the result was a car that did not require hours of gremlin hunting. It went about as smoothly as one could hope for, and so after all these years my project has hit the second of the 3 planned phases
I can finally update my profile with this:
Completely rebuilt 3rd gen 3SGTE swap w/ ~20k
Rebuilt S54 with helical LSD upgrade
Refreshed Superstrut suspension adapted for LHD w/ ST rear swaybar
GT4 calipers and rotors all around
SS brake lines
Custom 3" exhaust with electronic bypass
Pending upgrades:
devils own meth injection kit
HKS EVCS boost controller
I wont be able to enjoy the car unfortunately, winter is here and this thing will never see salt if I have anything to do with it. I did manage to squeeze in one brief driving day this weekend however....and my god, the helical makes all the difference in the world! I can literally control the car with one finger while both tires are busy spinning through second and third. Something like that would have been suicide in the past O.O Also standing turns on power is a thing now. An amazing thing The suspension and differential really make all the difference in the driving experience, I can actually access and make use of the power that would have otherwise been lost as smokey wheel hop. The result is a car that feels much faster than before without any modifications to the engine! Anyway, it's going to be put away until the midwest spring meet. Until then I'm going to have my brother compile the gopro video of the swap. We setup a tripod to take a picture once a minute, so it should make for a fun update 
This post has been edited by enderswift: Nov 24, 2014 - 11:12 PM
decided to take a few last pictures of the white celica before I put it into storage for the winter:
Oh yea, almost forgot. This happened:
The swap is done, my body is wrecked, but the beast is revived
I took things a lot slower with the swap this time. It took 4 days instead of the usual 2; but the result was a car that did not require hours of gremlin hunting. It went about as smoothly as one could hope for, and so after all these years my project has hit the second of the 3 planned phases
I can finally update my profile with this:
Completely rebuilt 3rd gen 3SGTE swap w/ ~20k
Rebuilt S54 with helical LSD upgrade
Refreshed Superstrut suspension adapted for LHD w/ ST rear swaybar
GT4 calipers and rotors all around
SS brake lines
Custom 3" exhaust with electronic bypass
Pending upgrades:
devils own meth injection kit
HKS EVCS boost controller
I wont be able to enjoy the car unfortunately, winter is here and this thing will never see salt if I have anything to do with it. I did manage to squeeze in one brief driving day this weekend however....and my god, the helical makes all the difference in the world! I can literally control the car with one finger while both tires are busy spinning through second and third. Something like that would have been suicide in the past O.O Also standing turns on power is a thing now. An amazing thing
The suspension and differential really make all the difference in the driving experience, I can actually access and make use of the power that would have otherwise been lost as smokey wheel hop. The result is a car that feels much faster than before without any modifications to the engine! Anyway, it's going to be put away until the midwest spring meet. Until then I'm going to have my brother compile the gopro video of the swap. We setup a tripod to take a picture once a minute, so it should make for a fun update
This post has been edited by enderswift: Nov 24, 2014 - 11:12 PM
Oh yeah! *Kool-Aid dude voice*
I should have bought a white one..
Lookin real nice man!
Lookin real nice man!
SPYRO|DARKSPYRO|CYRIL
Sweet Luke! I'm glad to see that it's back together
I've seen you a few times in the last few weeks after work cruising around your house in the red car and I've been wondering what happened with this thing. lol
I've seen you a few times in the last few weeks after work cruising around your house in the red car and I've been wondering what happened with this thing. lol
~bloodMoney
finally!! hahahah. everything looks great and clean. now you get to look at it allllll winter
now you get to look at it allllll winter
*1997 Celica ST - 3SGE Greytop BEAMS*1977 Celica RA29 - Classic Cruiser*2005 Matrix AWD - dedded but still hanging around like a ghost2019 Rav4 XLE Premium - Sports mode is fun.
haha thats the WORST time to finish up a car! right before winter. but hey its done! great job man!
1995 GT::::Diffusing the Situationエキサイティングカーレーシングチーム!march2010 COTM:6GCfeature2014:january2015-2016-2018 COTM
Car looks amazing!
I definitely feel your pain though, I can't put my all trac on the road until the spring. It's the biggest tease
I definitely feel your pain though, I can't put my all trac on the road until the spring. It's the biggest tease
Finishes swap just in time for boost season, parks car until boost season is over.  Can't wait to see it at the meet!
Can't wait to see it at the meet!
"Employ your time in improving yourself by other men's writings, so that you shall gain easily what others labored hard for." -Socrates. Even Socrates told us touse the search button!2006 Aston Martin V8 Vantage.1998 Celica GT-BEAMSSwapped.2022 4Runner TRD Off Road Prenium.2021 GMC Sierra AT4.
agreed! ^^^ Hopefully i will make it, such a long drive lol
It takes 8,460 bolts to assemble an automobile, and one nut to scatter it all over the road.Celica: The name is derived from the Spanish word for "heavenly" or "celestial".Back-2-Back July COTM 15&16
>
This made me look up all the family guy video of the Kool-Aid guy haha
>
Thanks Malek TBH I was really torn between black, white, and silver. I think these cars look amazing in those three colors. Silver being the best at highlighting the bulges and vents on a GT4 front end.
>
Thanks Chris. I had to relocate the project to my old mans machine shop once the weather turned south. I was hoping to be able to swap the motor in my driveway like before, but it just got too cold too fast. The paint shop simply took a lot longer than I expected, but that's okay. They did some amazing work and something like that takes time.
>
Finally is right! this has been an ongoing project since 2011. Since 2008 if you count my discovery of 6gc and Batmans/pressures threads
>
Thanks man, it was especially tough putting it away after only one day of boosting. I forgot just how strong the 3S pulls. I also forgot how wide the torque band is O.O ~2800-7000 of pupil dilating POWA. That boost addiction relapsed so. damn. hard. lol
Next summer with the boost controller and meth injection is gonna be fun!
>
Thank you! It's really come a long way. I wish I took more pictures from when I first got it, especially the interior. It was in pretty sad shape when I first brought it home. You have an altrac???? O.o
>
Boost season is a great thing. I used to love cool summer nights because the engine response just felt so much sharper, if that makes sense. Too bad Chicago boost season is the car equivalent of rolling around in a pile of asbestos insulation. DAT cancer
>
I hope you do! It would be good to finally see an example of the car I've been slowly trying to build!
This post has been edited by enderswift: Nov 27, 2014 - 2:37 PM
QUOTE (navseal345 @ Nov 24, 2014 - 12:01 AM)
>Oh yeah! *Kool-Aid dude voice*
This made me look up all the family guy video of the Kool-Aid guy haha
>
QUOTE (Malek @ Nov 24, 2014 - 12:48 AM)
>I should have bought a white one..
Lookin real nice man!
Lookin real nice man!
Thanks Malek
TBH I was really torn between black, white, and silver. I think these cars look amazing in those three colors. Silver being the best at highlighting the bulges and vents on a GT4 front end. >
QUOTE (bloodMoney @ Nov 24, 2014 - 10:23 AM)
>Sweet Luke! I'm glad to see that it's back together
I've seen you a few times in the last few weeks after work cruising around your house in the red car and I've been wondering what happened with this thing. lol
I've seen you a few times in the last few weeks after work cruising around your house in the red car and I've been wondering what happened with this thing. lol
Thanks Chris. I had to relocate the project to my old mans machine shop once the weather turned south. I was hoping to be able to swap the motor in my driveway like before, but it just got too cold too fast. The paint shop simply took a lot longer than I expected, but that's okay. They did some amazing work and something like that takes time.
>
QUOTE (cheela @ Nov 24, 2014 - 10:34 AM)
>finally!! hahahah. everything looks great and clean. now you get to look at it allllll winter
now you get to look at it allllll winter Finally is right!
this has been an ongoing project since 2011. Since 2008 if you count my discovery of 6gc and Batmans/pressures threads>
QUOTE (Tigawoods @ Nov 24, 2014 - 10:52 AM)
>haha thats the WORST time to finish up a car! right before winter. but hey its done! great job man!
Thanks man, it was especially tough putting it away after only one day of boosting. I forgot just how strong the 3S pulls. I also forgot how wide the torque band is O.O ~2800-7000 of pupil dilating POWA. That boost addiction relapsed so. damn. hard. lol
Next summer with the boost controller and meth injection is gonna be fun!
>
QUOTE (mkernz22 @ Nov 24, 2014 - 12:07 PM)
>Car looks amazing!
I definitely feel your pain though, I can't put my all trac on the road until the spring. It's the biggest tease
I definitely feel your pain though, I can't put my all trac on the road until the spring. It's the biggest tease
Thank you! It's really come a long way. I wish I took more pictures from when I first got it, especially the interior. It was in pretty sad shape when I first brought it home. You have an altrac???? O.o
>
QUOTE (richee3 @ Nov 24, 2014 - 12:12 PM)
>Finishes swap just in time for boost season, parks car until boost season is over. Can't wait to see it at the meet!
Can't wait to see it at the meet!Boost season is a great thing. I used to love cool summer nights because the engine response just felt so much sharper, if that makes sense. Too bad Chicago boost season is the car equivalent of rolling around in a pile of asbestos insulation. DAT cancer
>
QUOTE (4-eyed-freek @ Nov 24, 2014 - 3:24 PM)
>agreed! ^^^ Hopefully i will make it, such a long drive lol
I hope you do! It would be good to finally see an example of the car I've been slowly trying to build!
This post has been edited by enderswift: Nov 27, 2014 - 2:37 PM
I'm doing to be documenting most of what I do to mine, but yes! I picked up an 88 alltrac!
My thread is in the off topic section
My thread is in the off topic section
>
I need to hang out there more. Well, looks like I have a thread to read today
QUOTE (mkernz22 @ Nov 27, 2014 - 3:23 PM)
>I'm doing to be documenting most of what I do to mine, but yes! I picked up an 88 alltrac!
My thread is in the off topic section
My thread is in the off topic section
I need to hang out there more. Well, looks like I have a thread to read today
>
hahaha I guess so! It'll be slow progress until the summer
QUOTE (enderswift @ Nov 27, 2014 - 2:35 PM)
>>
I need to hang out there more. Well, looks like I have a thread to read today
QUOTE (mkernz22 @ Nov 27, 2014 - 3:23 PM)
>I'm doing to be documenting most of what I do to mine, but yes! I picked up an 88 alltrac!
My thread is in the off topic section
My thread is in the off topic section
I need to hang out there more. Well, looks like I have a thread to read today
hahaha I guess so! It'll be slow progress until the summer
By the book as usual! Looks great! I think you and I should build competing 5sgte builds!
Hello 6gc,
Managed to revive my ruined HTC long enough to recover a few photos from the swap:

Rented a U-haul to transport the 3S to a beautifully heated shop. 2300+ square feet all at my disposal It's a huge improvement compared to being at the mercy of the elements in my driveway!

It took some seriously gentle driving to make it to the shop safely. Ratchet straps can only do so much to secure something so top heavy, and I wasn't about to tempt murphy by hooking them directly onto the engine

Okay, hard part over, engine and car have been transported to the shop. Now I just have to transfer every tool I've ever acquired too

After days of preparations the swap finally started on a Friday night. We worked too many hours in a row before we had the empty bay shown above. It was now Saturday evening and I was too tired to trust myself with anything that involves long periods of concentration. So I spent the remainder of the day cleaning the bay and swapping in the GT4 brake proportioning valve.

Freed of its old home, this old grimy 5s will now be a parts engine for my daily.
I can tell that this car has had major work done to it before it came into my possession. There are signs of a prior engine swap all over the place. From missing passenger mount bolts, to scrapes on the frame rails, to needlessly labeled connectors... If I were to guess I'd say this car had a blown a motor in its past. They either replaced it completely, or had the cylinder head rebuilt (The head looks brand spankin new inside and out O.o). Either way they were complete amateurs that managed to damage a number of threads in the bay. Nothing my trusty tap and die kit couldn't fix though

With everything removed, the LSD trans and superstrut were given a once-over and quick cleaning. Everything seemed to be in good shape after the extended trial runs from this past summer. I made a point of really pushing the car to coax out any gremlins before the 3S swap. Nothing ever came up and seeing things holding up so well made me happy

With no time to waste we attached the new clutchmasters clutch onto a properly machined flywheel (.020) and set to dropping the engine in. The last time I swapped this engine the flywheel was cut too shallow and caused all kinds of engagement issues. I had to resort to maxing the clutch pedal adjustment and buying an extended pushrod just to shift into gear. This time however, I can shift with a stock pushrod and pedal adjustment. I really cannot emphasize the importance of a proper flywheel step enough...
Anyway, installing the engine was a slightly scary process this time. I raised the car as high as possible to ease the overall swap without realizing that we would have to max out the hoist just to clear the fender. This definitely sacrificed some stability on the hoist. I couldnt stop picturing the tiny o-ring inside the hoist giving out under the pressure and letting the engine crash onto the car. We couldn't hurry though, the center of gravity was so high that it would have been easy to tip the whole thing over.

several hours later the engine was hanging on its own mounts The rest of the swap was easy and consisted of connecting all the necessary lines, reinstalling the suspension, and cleanly routing a million gauge wires. It definitely feels good to have reached this point. I can finally direct my mind to something other than celicas!
Anyway I plan to post a video of the swap in the future. Unfortunately my brother is taking his time compiling it at the moment...
Hopefully I'll have another update in the near soon!
This post has been edited by enderswift: Dec 16, 2014 - 7:52 PM
Managed to revive my ruined HTC long enough to recover a few photos from the swap:
Rented a U-haul to transport the 3S to a beautifully heated shop. 2300+ square feet all at my disposal
It's a huge improvement compared to being at the mercy of the elements in my driveway!It took some seriously gentle driving to make it to the shop safely. Ratchet straps can only do so much to secure something so top heavy, and I wasn't about to tempt murphy by hooking them directly onto the engine
Okay, hard part over, engine and car have been transported to the shop. Now I just have to transfer every tool I've ever acquired too
After days of preparations the swap finally started on a Friday night. We worked too many hours in a row before we had the empty bay shown above. It was now Saturday evening and I was too tired to trust myself with anything that involves long periods of concentration. So I spent the remainder of the day cleaning the bay and swapping in the GT4 brake proportioning valve.
Freed of its old home, this old grimy 5s will now be a parts engine for my daily.
I can tell that this car has had major work done to it before it came into my possession. There are signs of a prior engine swap all over the place. From missing passenger mount bolts, to scrapes on the frame rails, to needlessly labeled connectors... If I were to guess I'd say this car had a blown a motor in its past. They either replaced it completely, or had the cylinder head rebuilt (The head looks brand spankin new inside and out O.o). Either way they were complete amateurs that managed to damage a number of threads in the bay. Nothing my trusty tap and die kit couldn't fix though
With everything removed, the LSD trans and superstrut were given a once-over and quick cleaning. Everything seemed to be in good shape after the extended trial runs from this past summer. I made a point of really pushing the car to coax out any gremlins before the 3S swap. Nothing ever came up and seeing things holding up so well made me happy
With no time to waste we attached the new clutchmasters clutch onto a properly machined flywheel (.020) and set to dropping the engine in. The last time I swapped this engine the flywheel was cut too shallow and caused all kinds of engagement issues. I had to resort to maxing the clutch pedal adjustment and buying an extended pushrod just to shift into gear. This time however, I can shift with a stock pushrod and pedal adjustment. I really cannot emphasize the importance of a proper flywheel step enough...
Anyway, installing the engine was a slightly scary process this time. I raised the car as high as possible to ease the overall swap without realizing that we would have to max out the hoist just to clear the fender. This definitely sacrificed some stability on the hoist. I couldnt stop picturing the tiny o-ring inside the hoist giving out under the pressure and letting the engine crash onto the car. We couldn't hurry though, the center of gravity was so high that it would have been easy to tip the whole thing over.
several hours later the engine was hanging on its own mounts
The rest of the swap was easy and consisted of connecting all the necessary lines, reinstalling the suspension, and cleanly routing a million gauge wires. It definitely feels good to have reached this point. I can finally direct my mind to something other than celicas!Anyway I plan to post a video of the swap in the future. Unfortunately my brother is taking his time compiling it at the moment...
Hopefully I'll have another update in the near soon!
This post has been edited by enderswift: Dec 16, 2014 - 7:52 PM
Such a beautiful car! white is absolutely gorgeous, i cant wait to see this car in Person!
It takes 8,460 bolts to assemble an automobile, and one nut to scatter it all over the road.Celica: The name is derived from the Spanish word for "heavenly" or "celestial".Back-2-Back July COTM 15&16
You do know McPherson and ST205 brake proportioning valve are the same.
Group buy to replicate Narrow E series transaxle partshttp://www.6gc.net/forums/index.php?showto...p;#entry1107514
Nice job! Victory burnouts!
2001 Miata LS 5-speed
>
Thanks man
>
at least its powdercoated
>
In the spring!
QUOTE (4-eyed-freek @ Dec 14, 2014 - 7:31 PM)
>Such a beautiful car! white is absolutely gorgeous, i cant wait to see this car in Person!
Thanks man
>
QUOTE (BonzaiCelica @ Dec 15, 2014 - 3:53 PM)
>You do know McPherson and ST205 brake proportioning valve are the same.
at least its powdercoated
>
QUOTE (Box @ Dec 15, 2014 - 5:23 PM)
>Nice job! Victory burnouts!
In the spring!
Hey 6gc,
Have a small update:

Got around to installing my Suspension Techniques rear sway bar. Holy crap this was tough to do without scraping up the new bar or the frame!
Had to lower the fuel tank just to get the stock one out It was worth it though, a quick parking lot slalom showed much less roll without any loss of ride comfort
The sway bar install is just one of many mini projects planned for this winter. I figure I may as well refine the car while it's in storage so its ready to go in the spring. A lot of this stuff falls under the 'nice to have' or 'peace of mind' category:
Rust-proof rear hatch pockets with internal chassis coating
Rust-proof rear wheel wells
Check on previously treated rust areas
Remove window tint (Kinda scary to drive at night at the moment)
Take apart passenger seatbelt retractor and flip it to the correct orientation (Previous owner installed it backwards...)
Install methanol injection
Install boost controller?
Mount HID ballasts cleanly
Re-aim washer nozzles
Locate and install battery tie-down
Replace throttle cable with an ST part (Most likely a lost cause)
Add heat reflective tape to underside of hood
Remount hood-drain properly
Adjust rear parking brakes
Replace passenger taillight bulb
Should keep me busy this winter
This post has been edited by enderswift: Jan 1, 2015 - 11:20 PM
Have a small update:
Got around to installing my Suspension Techniques rear sway bar. Holy crap this was tough to do without scraping up the new bar or the frame!
Had to lower the fuel tank just to get the stock one out
It was worth it though, a quick parking lot slalom showed much less roll without any loss of ride comfort The sway bar install is just one of many mini projects planned for this winter. I figure I may as well refine the car while it's in storage so its ready to go in the spring. A lot of this stuff falls under the 'nice to have' or 'peace of mind' category:
Rust-proof rear hatch pockets with internal chassis coating
Rust-proof rear wheel wells
Check on previously treated rust areas
Remove window tint (Kinda scary to drive at night at the moment)
Take apart passenger seatbelt retractor and flip it to the correct orientation (Previous owner installed it backwards...)
Install methanol injection
Install boost controller?
Mount HID ballasts cleanly
Re-aim washer nozzles
Locate and install battery tie-down
Replace throttle cable with an ST part (Most likely a lost cause)
Add heat reflective tape to underside of hood
Remount hood-drain properly
Adjust rear parking brakes
Replace passenger taillight bulb
Should keep me busy this winter
This post has been edited by enderswift: Jan 1, 2015 - 11:20 PM
i cussed a lot when i did mine, it was bad, so tight, i did end up scratched the bar.
Learned a lot in 10 years...I hardly log in anymore, last loginToday Sept 6 2019, and I was forced just to clarify a post. LOLIf you PM me and I dont respond, dont fret or cry. Im alive, better post your questions in the thread below, maybe I log back in2grfe Swapped...Why I chose the 2GR, before you ask read here...A great civilization is not conquered from without until it has destroyed itself from within.@llamaraxing in Instagram is the best way to find me. I hardly log here anymore.
Yup, same here installing my Whiteline. Except I had to do it all twice since I got sold the wrong bar the first time -.-
Looks great though
Bet you can't wait for Spring!
SOLD :( 1997 ST204 Celica ZR ----->See it here on 6GC!2013 October Celica of the Month XDNow: '00 NB8B Mazda MX5 ----->See it here in off topic!
>
Glad to see a few other people had just as much fun as I did
>
Yikes. Twice. That really sucks. I cant imagine putting myself through that again so kudos for patience haha
And yea, spring cant come soon enough! This was me after switching to storage insurance:
https://www.youtube.com/watch?v=OzFqhHQXPqk
QUOTE (njccmd2002 @ Jan 1, 2015 - 10:14 PM)
>i cussed a lot when i did mine, it was bad, so tight, i did end up scratched the bar.
Glad to see a few other people had just as much fun as I did
>
QUOTE (JoshuaM @ Jan 1, 2015 - 11:02 PM)
>Yup, same here installing my Whiteline. Except I had to do it all twice since I got sold the wrong bar the first time -.-
Looks great though Bet you can't wait for Spring!
Looks great though
Bet you can't wait for Spring!Yikes. Twice. That really sucks. I cant imagine putting myself through that again so kudos for patience haha
And yea, spring cant come soon enough! This was me after switching to storage insurance:
https://www.youtube.com/watch?v=OzFqhHQXPqk
Hello 6gc,
I have a small update:

These guys just came in from Poland. I'll be installing them this weekend to remedy a rear suspension noise that's been bothering me for a while. I'm also just really interested to try these out after the stellar reviews from other members. Fingers crossed that the install will go smoothly!
In other news, I think I've just about worked out the last details on a water injection install and will be starting that soon. My biggest obstacle was mounting the nozzle without drilling into either the throttle body or charge cooler. Luckily I found an mr2 throttle body adapter on KO racing that can be modified to do the job:
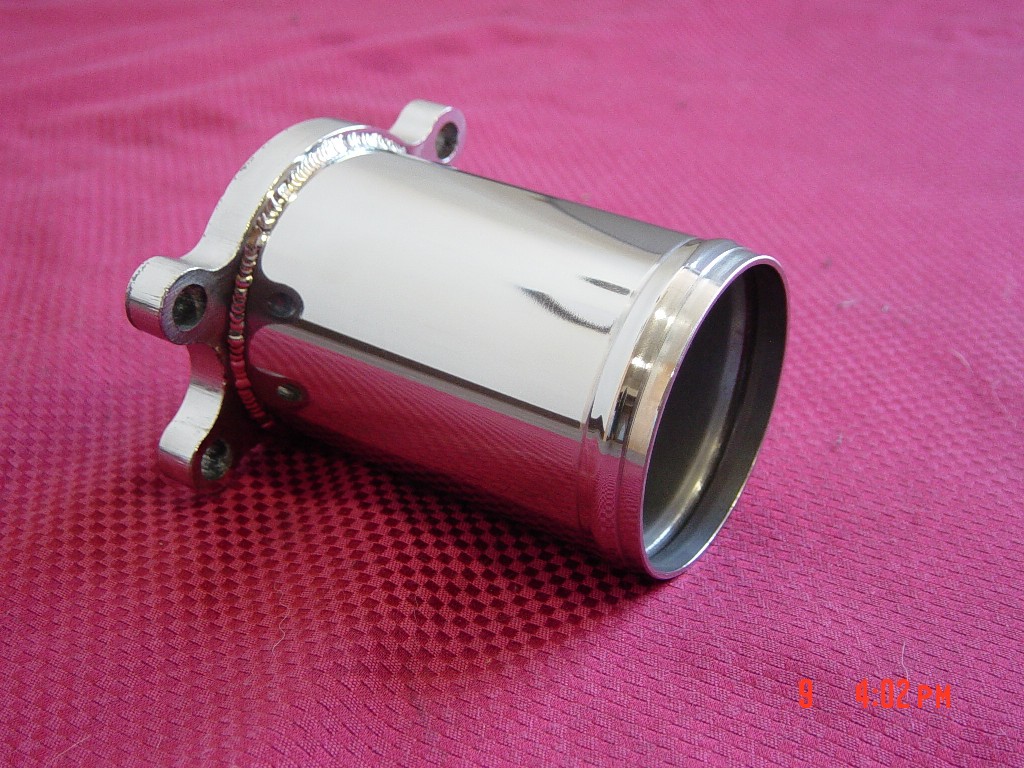
I purchased the stubby version, but I will still most likely have to shave some length off on a lathe. Once it fits I'll drill and tap a slightly undersized hole to allow the nozzle to thread in before covering the polished finish with a satin black coating. From there I will work to do a stealthy install of the rest of the system; my goal is to only have the nozzle and a portion of the line visible in the bay. I'm also going to follow the path of a few other members and install a system activity indicator light (pictured above), as well as a low fluid level light in the interior. should be fun!
This post has been edited by enderswift: Feb 3, 2015 - 10:43 PM
I have a small update:
These guys just came in from Poland. I'll be installing them this weekend to remedy a rear suspension noise that's been bothering me for a while. I'm also just really interested to try these out after the stellar reviews from other members. Fingers crossed that the install will go smoothly!
In other news, I think I've just about worked out the last details on a water injection install and will be starting that soon. My biggest obstacle was mounting the nozzle without drilling into either the throttle body or charge cooler. Luckily I found an mr2 throttle body adapter on KO racing that can be modified to do the job:
I purchased the stubby version, but I will still most likely have to shave some length off on a lathe. Once it fits I'll drill and tap a slightly undersized hole to allow the nozzle to thread in before covering the polished finish with a satin black coating. From there I will work to do a stealthy install of the rest of the system; my goal is to only have the nozzle and a portion of the line visible in the bay. I'm also going to follow the path of a few other members and install a system activity indicator light (pictured above), as well as a low fluid level light in the interior. should be fun!
This post has been edited by enderswift: Feb 3, 2015 - 10:43 PM

Cannot wait to feel what the 3S is like with a suspension and tires that can handle the power!

Also purchased a much needed toolbox expansion. Unfortunately craftsman stopped making blue boxes a long time ago

This post has been edited by enderswift: Feb 11, 2015 - 7:08 PM
Nothing like the feel of new rubber, or the smell for that matter. Mmmm, silica rubber compound...
2001 Miata LS 5-speed
Well 6gc,
I've finally finished what has turned out to be the worst project I've ever had the misfortune of taking on. Words cannot describe just how big of a pain in the ass these bushings were to install. I dont know what I would have done if not for the tools I bought during the transmission rebuild. My bearing separator kit in particular turned out to be a huge help.
For those who have not gone through this, there is a certain ~10 inch bolt that secures the lateral links to the rear spindles. For whatever reason this bolt likes to fuse itself to the spindle permanently. I nearly destroyed my press before the things budged. It sounded like a gunshot each time O.O
Furthermore the poly kit from GT4 racing arrives with zero instruction/suggestions specifiying the correct orientation of the bushings... or the fact that two of the 8 lateral link bushings are a different diameter. I pretty much had to figure all of this out through trial and error, which was extremely labor intensive and not fun.
Anyway, heres the final product:


Here is the aforementioned 10in bolt. I had to cut the ends of the originals with my saws-all to even get them on the press. Toyota must have realized that these bolts were basically press-fit into the spindles because the new replacements had an updated part number and were slightly smaller in diameter.

Fortunately the subframe bolts came out without issue.

Soon the rear end of this car will be complete. So far I've replaced the bushings, rear top mounts, struts, insulators, springs, brakes, everything haha. Better perform well or I'll be thoroughly dissapointed.

Here are the bushings that were being replaced, relics of of Toyotas old sport suspension package. At one point these were fantastic bushings and I would have been really happy to have kept them. Solid bushings > polyurethane > rubber afterall. Unfortunately one of them was clunking so I was compelled to try poly instead. Normally the sport suspension adds an extra headache to the poly install because of retaining clips in the lateral links. Fortunately that only applies to 96+ cars. 94-95 solid bushings press right out and the opening is immediately ready for poly.
I still have to reassemble the rear suspension, but that's really nothing at this point. 90% of the work has been done so it's all downhill from here. I plan to have this this all wrapped up by this weekend, at which point the car will be coming out of storage
This post has been edited by enderswift: Mar 18, 2015 - 10:30 PM
I've finally finished what has turned out to be the worst project I've ever had the misfortune of taking on. Words cannot describe just how big of a pain in the ass these bushings were to install. I dont know what I would have done if not for the tools I bought during the transmission rebuild. My bearing separator kit in particular turned out to be a huge help.
For those who have not gone through this, there is a certain ~10 inch bolt that secures the lateral links to the rear spindles. For whatever reason this bolt likes to fuse itself to the spindle permanently. I nearly destroyed my press before the things budged. It sounded like a gunshot each time O.O
Furthermore the poly kit from GT4 racing arrives with zero instruction/suggestions specifiying the correct orientation of the bushings... or the fact that two of the 8 lateral link bushings are a different diameter. I pretty much had to figure all of this out through trial and error, which was extremely labor intensive and not fun.
Anyway, heres the final product:
Here is the aforementioned 10in bolt. I had to cut the ends of the originals with my saws-all to even get them on the press. Toyota must have realized that these bolts were basically press-fit into the spindles because the new replacements had an updated part number and were slightly smaller in diameter.
Fortunately the subframe bolts came out without issue.
Soon the rear end of this car will be complete. So far I've replaced the bushings, rear top mounts, struts, insulators, springs, brakes, everything haha. Better perform well or I'll be thoroughly dissapointed.
Here are the bushings that were being replaced, relics of of Toyotas old sport suspension package. At one point these were fantastic bushings and I would have been really happy to have kept them. Solid bushings > polyurethane > rubber afterall. Unfortunately one of them was clunking so I was compelled to try poly instead. Normally the sport suspension adds an extra headache to the poly install because of retaining clips in the lateral links. Fortunately that only applies to 96+ cars. 94-95 solid bushings press right out and the opening is immediately ready for poly.
I still have to reassemble the rear suspension, but that's really nothing at this point. 90% of the work has been done so it's all downhill from here. I plan to have this this all wrapped up by this weekend, at which point the car will be coming out of storage
This post has been edited by enderswift: Mar 18, 2015 - 10:30 PM
That's precisely why I sold my poly rear bushings instead of using them. I'm not as brave as you are.
"Employ your time in improving yourself by other men's writings, so that you shall gain easily what others labored hard for." -Socrates. Even Socrates told us touse the search button!2006 Aston Martin V8 Vantage.1998 Celica GT-BEAMSSwapped.2022 4Runner TRD Off Road Prenium.2021 GMC Sierra AT4.