Over 1M Posts • 84K Topics • 9K Authors

ST205 Total Rebuild - 6G Celicas Forums

Topic #88340 480 posts Started by Nial
Got some colour put on the other day, managed to hand paint on some extra tough 2K lacquer. its not perfect but to be honest I am not that bothered, its just for protection as it will be covered by carpet etc......the engine bay is better. Some more of the 2K lacquer will arrive in the next day or so, I will then spray it onto the rest of the engine bay and finish the interior. Then i will be ready to install the brake lines, wiring and interior. Busy weeks ahead smile.gif

My little garage with my cramped working space smile.gif


the interior - front


and the back


the boot...slight problems in the wheel well, but again it will be covered by sound deadening etc so as long as the rust protection is there i aint bothered.


hopefully by the end of the week it will be all shiny smile.gif


My Facebook GT4 Build page.https://www.facebook.com/groups/GT4Rebuild
Great looking work, Nial!

Looks like 'Spring has Sprung', you are moving speedily along, and the slow, tedious stuff is behind you. I'd bet you are feeling a bit giddy at this point?

I've been watching your build for almost the duration, pulling for you when you were about ready to give up, cheering for you when you got married, moaning for you when you had to redo so much at one point. This latest series of photos shows me that you are way beyond the half-way point and are heading down the home stretch.

Here is a comment on the presentation of your build. It is for a person like me who hasn't had the experience of doing the kind of work you are doing, your pictures have the effect of going from one kind-of final state to another final state, as if by magic (the work you do between picture sets is missing). It is obvious that you have applied paint (and looks beautiful). Knowing that you have your hands full in reconstructing your vehicle, I hate to ask anything of you that imposes extra work, however, I thought I would at least broach the following question/idea.

Do you have any more information you could post, such as action videos that show how you go about applying (spraying) the paint, and could you provide detailed information (pics?) on which paints, undercoatings, etc. that you use, as well as info on the painting equipment you utilize (pics)? I remember once that you listed out the many levels of paint (coatings) that you had planned to apply and I haven't taken the time to go back and dig that out, but will if you could show or describe the products you use and what's the best way you have found to apply them, especially in such tight quarters (how the heck do you do that?). I check out YouTube whenever I have to do a task that I have never done before because people show pretty clearly, using video, how they go about doing what they do. Whether good, fair, excellent, or even poor, I often get a quick introduction/education. If it is too much to ask, or you can't stomach even thinking of doing more extraneous crap, that is OK. . . REALLY OK! It is just a thought about how you might make your build come across 'maybe' a little better than it already does, but that's a suggestion from someone who isn't in the direct line of fire.

BTW: Here is an aside: I'd hate to see this build thread slowly degenerate over time as photos get removed from whatever website they link from, like I have seen on some others whenever i have tried to check out older threads. The information is much too important to people like myself to let it be treated with such disrespect, and I hope this website will figure out a better way to maintain information into perpetuity. Maybe that should be directed to someone else. Maybe it is different now and I just haven't caught up?

All that said, I still have my hat off in your honour of the magnificent effort you have mounted! And I wish you the best going forward.
Langing........Cheers pal, as ever your words of appreciation and encouragement are appreciated. I post what phots I can, "action" shots may prove difficult as I am always the one holding the camera so it's awkward to shoot myself doing something biggrin.gif

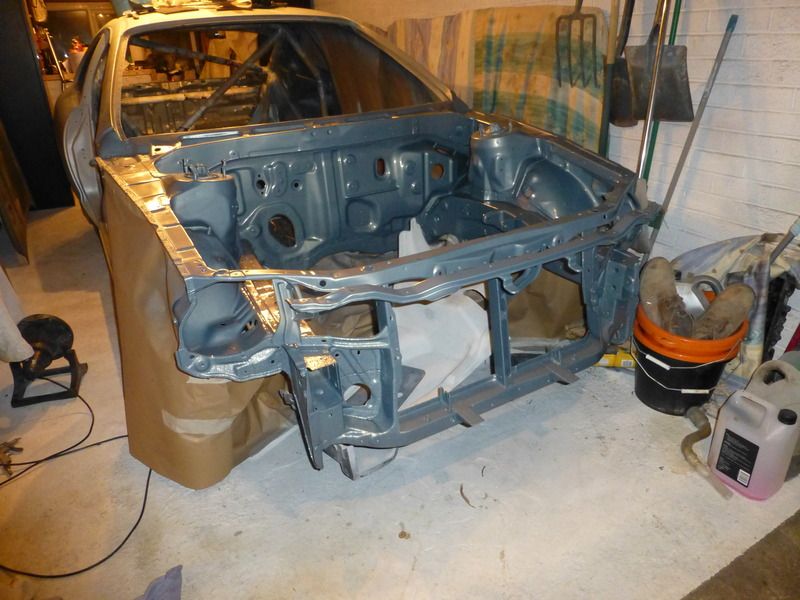
Paints wise, it's certainly been a challenge. I have gone through how I did it at each stage, Generally I have spray painted everything, a confined space isn't so much of a problem.....yet. I have ordered some wheel trollies so I can move the car from side to side when it comes to spray painting the outside. The only thing I would apply with a brush was the POR15 clear coat....it used to be called Glisten PC which I think it still is in the US, over here it has been renamed 2X Urethane, all POR15 products brush on well, be careful with the engine enamel, hard nose and top coat paints, they really need a thinners adding as they go on real thick and run like a bugger. But dry with no visible brush marks. I will be spray painting the 2X Urethane paint for the first time at the weekend, mixed probably about 15% thinners. The 121 Epoxy Mastic dosnt brush on well, it's easy, but it leaves horrible brush marks that stay and often looks like a ploughed field biggrin.gif., spray it with about 10% thinners! it goes on well and is very forgiving. The Undercoat used was a high build 2 pack primer from Max Mayer (3011 HS) IIRC ......it needs a hardener, it also needs about 10% thinners, but not essential. The colour coat I have tried also from Max Mayer......with 0% thinners up to 50% thinners. 0% thinners has better coverage but the finish is orange peely ( is that even a word?) 50% thinners gives a smoother finish but needs more coats to get the coverage but as I am in no rush I recon I will stick with 50%. I have mixed feelings about the Eastwood paints, some can be great, others terrible, but the terrible ones can be good on certain surfaces, while the good ones can be crap on other surfaces......it seems very hit and miss. I have avoided the usual household paints, there is a popular one in the UK called Hammerite, it's tough, but brittle and not massively impact resistant, it also smells bad when it gets hot....ie if you use it on brake calipers.

Thats about it for paint, I havnt finished yet, but to sum up, spray where ever possible. For the inaccessible parts I generally point, spray and hope for the best, you can set the paint gun up to shoot a more or less lazer like spray patern, but you have to be careful, although chances are in those areas you would never see it anyway if the paint did run a little.

I will on one occasion take detailed photos, I will wait until I get to the outside of the car so its easier to see, but if I do that too often it will just annoy me an I will lose interest in maintaining the thread. I also don't have much spare time so most of my efforts go towards actually doing the work and not accurately recording the process of doing it smile.gif

I will also take some pictures of the compressor set up, I have changed it and don't recal posting the new photos.

My Facebook GT4 Build page.https://www.facebook.com/groups/GT4Rebuild
Thanks for that good information, Nial. I do understand your situation. Just continue on the way you have so well so far and I will stay happily engaged.

When you get around to posting pics of your compressor setup, you might also include some of the spray painting equipment you use?

I remember back to 'In The Beginning. . ." when you said you were going to have to learn how to weld and (I think, spray paint), and I remember being amazed at how fast you took to the unfamiliar whenever needed, seemingly 'all by yourself': adding on to your garage, adding an enclosure in the back to house your air compressor and deaden its sound, installing water filters in your air lines so the water wouldn't mess the paint, slapping on those roll bars, constructing a rotisserie, and grinding down all the imperfections in the metal to make the surface PERFECT for reception of the paints. And I cannot forget all those pieces of hardware coming back from the zinc platers, or the hybrid bumper you invented! So, it is not just your persistence that I admire, it is your ability to just tell yourself WHAT YOU INTENDED TO DO and then you actually did it! You took a dream and made it become a reality!! Your whole build is an inspiration and I hope many people will find their way to enjoy and learn from your build thread.
Another coat of lacquer...i have to resist the temptation to touch it for four days now for it to fully harden (That sounds wrong biggrin.gif)

I gave it a liberal squirt with cavity wax and fitted the front crash bar.


My compressor set up, working well so far. no water in the lines smile.gif


This post has been edited by Nial: Apr 18, 2015 - 10:42 AM

My Facebook GT4 Build page.https://www.facebook.com/groups/GT4Rebuild
Looks really good! Must resist the temptation to touch! wink.gif

It takes 8,460 bolts to assemble an automobile, and one nut to scatter it all over the road.Celica: The name is derived from the Spanish word for "heavenly" or "celestial".Back-2-Back July COTM 15&16
You should run the donut on all corners. tongue.gif

2001 Miata LS 5-speed
I have got four space savers fitted........gets space free and stops me ruining proper alloy wheels. Would be interesting to drive it like that.

My Facebook GT4 Build page.https://www.facebook.com/groups/GT4Rebuild
I think it'd be fun in a giant open space, probably like skating on ice. tongue.gif

2001 Miata LS 5-speed
A few more parts added........

Brake & Clutch Pedals & Dash beam thing (whatever its called)


From the engine bay


My Facebook GT4 Build page.https://www.facebook.com/groups/GT4Rebuild
how are you gonna bring yourself to actually drive this thing? At this point it should go into a helium filled glass case...

edit:

forgot to mention that the zinc plating is sexy

This post has been edited by enderswift: Apr 20, 2015 - 9:41 PM
this is a museum piece for sure

1995 GT::::Diffusing the Situationエキサイティングカーレーシングチーム!march2010 COTM:6GCfeature2014:january2015-2016-2018 COTM
Fitted the first layer of sound deadening, similar to dynomat but lighter and not so thick, other than the boot floor this is the only area I will be putting this stuff. the second layer will be a light closed cell foam which will go all over the floor, roof, boot etc.


fitted the refurbished wiper motor and wiper mech...what a horrible job.


ID plate re-rivetted in place.


the wiper arm pivot and those little hook things that catch the back of the bonnet


still all clean......for now


tonight i will start recovering the wiring loom.....i hate electrics.

My Facebook GT4 Build page.https://www.facebook.com/groups/GT4Rebuild
Wiring is always my biggest fear, no worries. A lot of people here can help if need be!

It takes 8,460 bolts to assemble an automobile, and one nut to scatter it all over the road.Celica: The name is derived from the Spanish word for "heavenly" or "celestial".Back-2-Back July COTM 15&16
I think everyone hates electrics, even electricians.

2001 Miata LS 5-speed
I actually prefer electronics but I'm an electrical engineer/programmer so that stuff interests me unless I have an intermittent connection that I can't find in some sensor. I'm fixing all the wiring on my Celica project currently. The previous owner did a number on it.
I love all the attention to detail that you are putting towards the Celica.
Your comment regarding the difficulty of reinstalling the wiper motor and mechanism. What made that job particularly troublesome?
>
QUOTE (Langing @ Apr 23, 2015 - 8:59 AM) *
>Your comment regarding the difficulty of reinstalling the wiper motor and mechanism. What made that job particularly troublesome?


Access to the nut on the back of the wiper motor that attaches it to the wiper mechanism....trying to do it with out scratching the new paint was difficult.

My Facebook GT4 Build page.https://www.facebook.com/groups/GT4Rebuild
>
QUOTE (Box @ Apr 22, 2015 - 3:55 PM) *
>I think everyone hates electrics, even electricians.


Sorry, Box, unless you were being 'tongue in cheek', what you think true is not. In the first place, rarely is any absolute (everyone) going to be true. Then, there does exist a small but reasonably sized class of people who do like electrics, electronics, etc.(I am one), else we would not have so much of that stuff filling our lives. Also, to believe that electricians, people whose job is to wire up electrical systems, hate electrics is ridiculous on its face. They don't all hate their jobs! Nonetheless, I think I understand what caused your remark, and it is like math, so many people do not have any understanding of it, which leads to a kind of fear. The best path to take is to keep your mind open to learning whatever you are capable of about everything (i.e. love learning). wink.gif

That being said, troubleshooting electrical problems in automobile wiring can be difficult and is sometimes very frustrating, even when you have a full schematic diagram. But, then the approach should be methodical and systematic, using the small amount of knowledge of electricity that is required, and which can be found in most good repair manuals. There is no witchcraft involved, so nothing to 'hate'.
There should be a bit of progress every day now smile.gif

Todays fun and games....brake lines. it dosent look like i have done much, but alot of time is spent retapping bolt holes and cleaning threads up.


I am having to rebend the brake lines as they dont quite run parallel to each other, but thats an easy fix.


I also started to fit the closed cell foam (sound deadening) to the roof, its very light, weighs almost nothing, but its a bit expensive for what it is. the floor, bulkhead, roof door insides, boot floor will all get covered in it smile.gif


My Facebook GT4 Build page.https://www.facebook.com/groups/GT4Rebuild
tackled the recaros today....well one of them. i tried one of the ebay bolster suppliers and the quality is spot on, so i will purchase the other bolster for the other seat later.

You can see the split in the foam.


Under the foam there is a metal support ring, it is this that cuts through the foam making the split. The bolster has this bit re-inforced but i guess old age has taken its toll.

with the bolster replaced


its a pretty easy job to do to be honest, i was expecting it to be harder, about ten mins to do a bolster from start to finish.

I think thats it for today...i had planned on doing more but Jo has bought me some beers and the last Hobbit DVD so its feet up time smile.gif

back on with it tomorrow smile.gif

My Facebook GT4 Build page.https://www.facebook.com/groups/GT4Rebuild
I want your seats. redface.gif

2001 Miata LS 5-speed
Painting the roll cage...this is hopefully the last bit of major painting to do until i decide to tackle the outside. Its a rubberised & textured enamel, goes on with some force, but dries nicely.

The roll cage in all its masked off glory smile.gif


tomorrows task is to finish a bit more sound deadening on the firewall then start refitting the loom which i started refurbishing at the weekend.

My Facebook GT4 Build page.https://www.facebook.com/groups/GT4Rebuild
Ha ! You made a page for the rebuild !
That's awesome.

my st205 swapandour Beams swap
>
QUOTE (Batman722 @ May 1, 2015 - 7:57 PM) *
>Ha ! You made a page for the rebuild !
That's awesome.


It's only basic, but it keeps the constant car updates off my normal facebook page.....my non car friends complained all I ever posted was car stuff biggrin.gif

My Facebook GT4 Build page.https://www.facebook.com/groups/GT4Rebuild
Aaaaaaaargh I hate wiring.......where's a beer!?

My Facebook GT4 Build page.https://www.facebook.com/groups/GT4Rebuild
*air lifts crate of Crabbie's Ginger Beer*

2001 Miata LS 5-speed
Had some of that yesterday smile.gif

Tiger beer tonight smile.gif

My Facebook GT4 Build page.https://www.facebook.com/groups/GT4Rebuild