Over 1M Posts • 84K Topics • 9K Authors

Stef's 7A-FE Rebuild - 6G Celicas Forums

Topic #51960 186 posts Started by hurley97
i just read the entire thread, great work. and i love girls that can work on cars....

omg i rebuild my head before and it was a bitch getting to those keepers and putting it back on is liek hell!


gluck

94 celica GT92 honda prelude si<h22 swap>93 eagle talon TSI <4G63 powered>i wish it was AWD90 mitsu eclipse GSX<4G63 powered>SOLDLEXUS IS300< im looking for one!
I demand pics !

I will return one day.
ok well the mod said it. you must do it smile.gif
it will actually help since some ppl might plan a 7a rebuild..

QUOTE"And, as always, your friendship, help, and dedication to the advancement of Texas Celica dominance is GREATLY appreciated. Thanks bro." -DEATH1994 GT:V6 swap, 5speed E53 W/ LSD, All Power, now RED1995 ST:SOLD @273k miles, Auto, all power, CarPC, White1994 ST:Totaled, 5spd, all power, RedRIP 07/09/09 @ 241,8101994 Lexus LS400:This is my new DD
sorry, I haven't had time to upload and explain things.
someone asked about re-shimming the valves so I took some pics before the valve cover went on today.


first you hand tighten the cams in (no need to torque them at this point) and turn it to top dead center. starting with one side first and using a feeler gauge...
IPB Image

do only the valves where the lobes are facing up. pull out the min and max sizes on the feeler gauge.
the minimum should fit between the shim and the cam lobe...
IPB Image

and the maximum should not fit all the way under the lobe at all...
IPB Image

7A-FTE:It's not about the money.Our Beams Swap.I <3 Dustin---07/16/06
then turn the cams half a revolution (there is a little dowel pin that goes into the cam gear that faces up when at TDC, just make that face down this time) and repeat the steps for the rest of the valves.

mark on the ledge of the valve cover which ones are in spec and which ones are out. also make sure to remember if the ones that are out of spec are too tight or too loose.

at that point you have to take the cams back out. any valves that are in spec, leave alone. to take out the shim, in the second picture you can see a little notch in the cap, just pry the shim out with a little screw driver. now measure it with a micrometer like this...
IPB Image
and put in a shim that bigger or smaller depending on your clearance measurement with the feeler gauge.

then put the cams back in and torque them down.


note: in case anyone didn't know, the intake cam is spring loaded so you have to put a bolt in the threaded hole before you remove the dependent cam otherwise it will spring out of alignment.

7A-FTE:It's not about the money.Our Beams Swap.I <3 Dustin---07/16/06
>
QUOTE(hurley97 @ Oct 10, 2007 - 4:01 PM) [snapback]603776[/snapback]
>
driver. now measure it with a micrometer like this...
IPB Image


LOL thats not a micrometer, but a very nice set of dial calipers.( I have 2 pairs identical to that)
Very good write up. smile.gif Please do mine now.

This post has been edited by 97lestyousay: Oct 10, 2007 - 7:10 PM

JDM guy made me do it.
GETTING CLOSE!! just putting little things back on now, there are a few things I'm going to transfer over from the motor that is in my car right now (i.e. fuel rail, alternator, power steering pump, and a few other small things)

we test fitted the turbo exhaust manifold the other day, it does need to be shaved down a little to clear the alternator bracket. I also brought my turbo into work that day to see how it sat, we did end up having to re-set the orientation of the turbo but now its perfectly the way I want it.
IPB Image


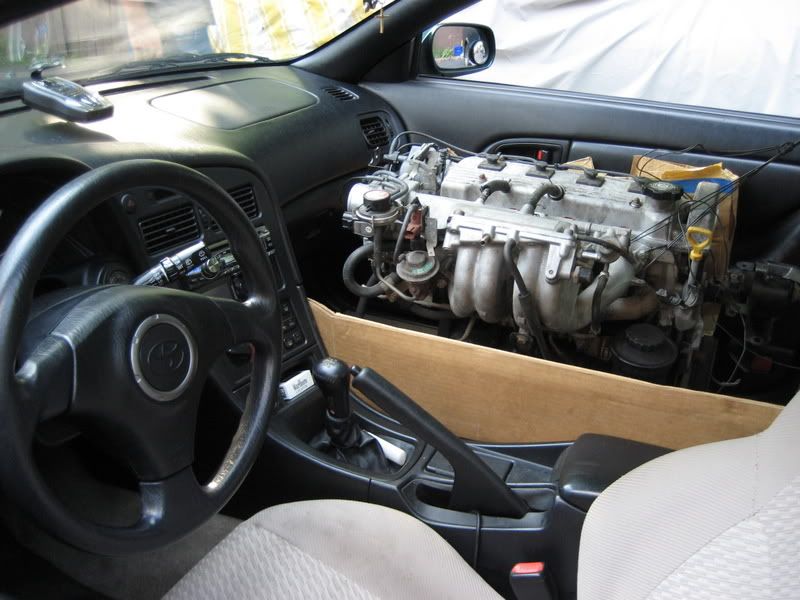
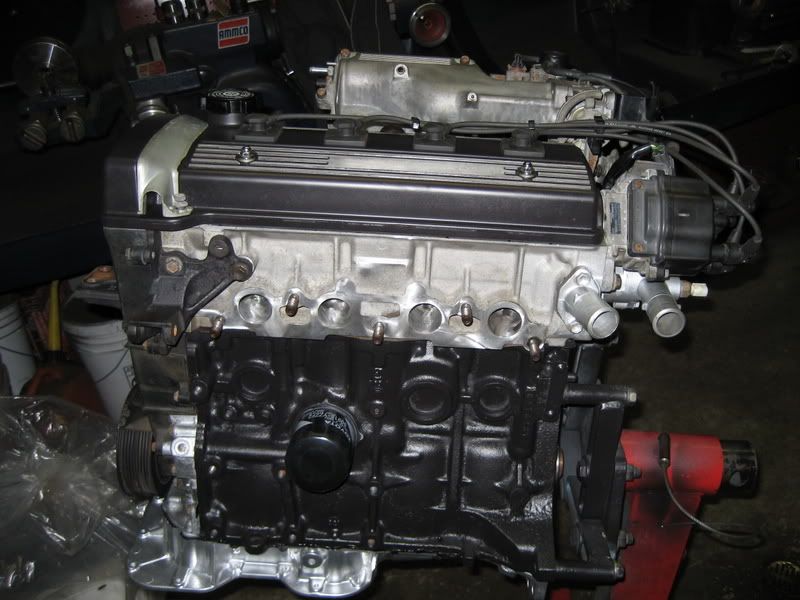
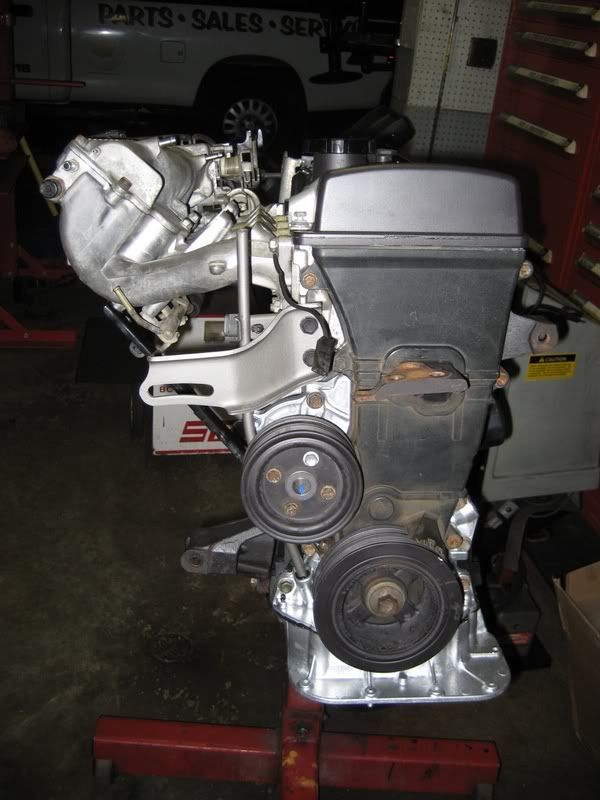
So now what you've all been waiting for, what I've been waiting for anyway, its pretty much done...
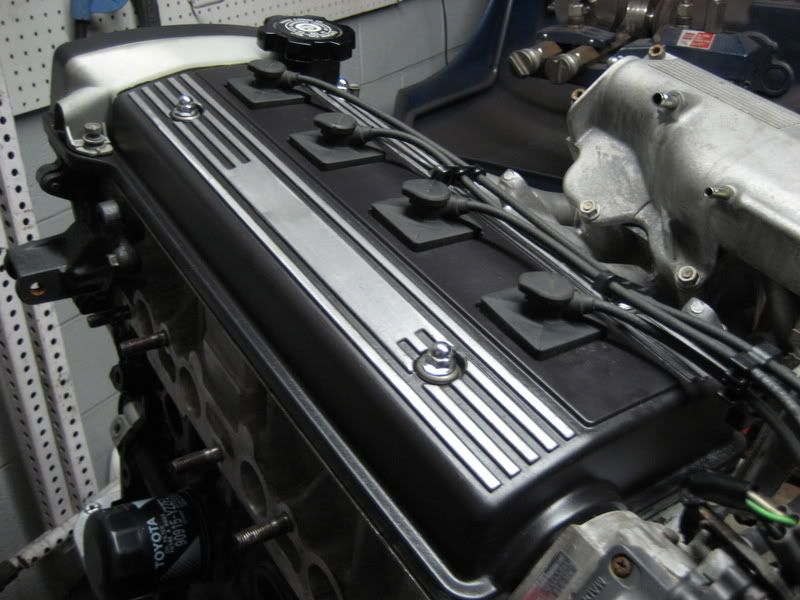
Peter (the tech thats helping me with this) painted the valve cover, put the water pump and timing belt on for me the other day when I was late. Today we changed the distributor O-ring, put the valve cover on (with the help of a little FIPG in the sharp corners), spark plugs in, distributor, plug wires back on, put all the EGR stuff back on, cleaned up the IAC (which was stuck btw) and throttle body and put those back on, little things like that.... and heres how she sits right now.....

IPB Image

IPB Image

IPB Image
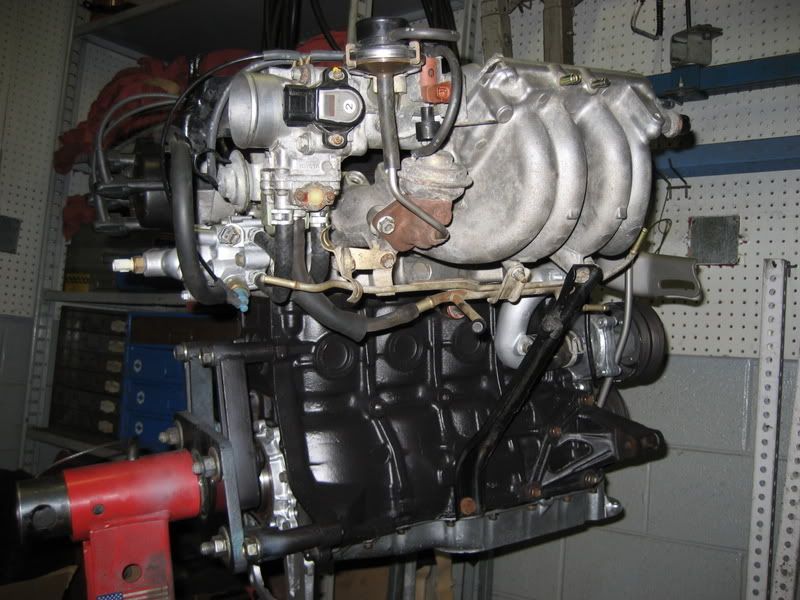
I know there are a few things on the back we didn't clean but thats ok, nobody is going to see them, except you guys...

IPB Image


So I'm pretty happy with all this, I'm excited to get this motor in. I almost want to re-think the whole waiting until 200k miles and just give in and do it at 195k.... hmmm

biggrin.gif biggrin.gif

7A-FTE:It's not about the money.Our Beams Swap.I <3 Dustin---07/16/06
looks like every things coming along great there stef. I love the look of that valve cover. You gonna do your I/C piping in black too? or silver??
good work stef, can't wait to see this in your car!
it turns me on that you know so much. knowledge is power. i like the whole black and silver scheme.

Visit My Automotive & Tech Blog.
very nice steff..

if you want an extra fuel rail/alt/ps pump let me know i have them just sitting in my garage, so you don't have to piece apart the motor in ur car. i'm going to toss the motor soon ne-ways

keep up the good work.
>
QUOTE(97lestyousay @ Oct 10, 2007 - 8:07 PM) [snapback]603779[/snapback]
>
>
QUOTE(hurley97 @ Oct 10, 2007 - 4:01 PM) [snapback]603776[/snapback]
>
driver. now measure it with a micrometer like this...


LOL thats not a micrometer, but a very nice set of dial calipers.( I have 2 pairs identical to that)
Very good write up. smile.gif Please do mine now.

haha... yeah yeah smartass... tongue.gif I didn't know what else to call it, thanks for the correction though

bring your car over here next time and I'll think about it biggrin.gif

7A-FTE:It's not about the money.Our Beams Swap.I <3 Dustin---07/16/06
damn.... what a rebuilt. good job bro
>
QUOTE(normality78 @ Oct 12, 2007 - 1:10 AM) [snapback]604122[/snapback]
>
damn.... what a rebuilt. good job bro


Bro? haha!

Now do a 5sfe after your done! biggrin.gif

This post has been edited by 99GT: Oct 15, 2007 - 10:40 AM
>
QUOTE(hurley97 @ Sep 11, 2007 - 6:13 PM) [snapback]595228[/snapback]
>
So obviously my oil problem is only getting worse, I decided it's finally time to do something about it.

so I went and picked up Defgeph's old 7A...
177,000 miles and was begining to use some oil before he swapped and it sat in the garage for 2 years.
but since I was getting it for free from a friend I decided to pick it up and hope for the best...
IPB Image


so I picked it up Fri (8/24) and the next day it came with me to work (I work at a Toyota dealer) where they unloaded it into the brake lathe room and it stayed hidden for a while. this past Saturday (9/8) me and one of the techs began tearing it apart. I was pleasantly surprised to find that it is actually in incredibly good condition for its age...

I will be spending close to $500 in parts replacing every bearing, seal, gasket, etc that we can think of. What I need from you guys are your suggestions as to what I can do to make this motor a little stronger and better flowing. I'm keeping the stock pistons and considering bigger cams and having the head machined.

We work for about an hour each morning before customers start coming in. Between Sat, Mon, and Tues (today) we have everything pretty much apart (except for the valves since I haven't decided to send them to the machinist with the head or not yet). This is a huge learning process for me and happy to have the oppotunity to do it. I'll add more pics and info so maybe some of you can learn some things too.

my question is were are you finding internals for the 7a? i look every and all i can find is stuff for the GT motor i would like to super charge my st and rebuild my motor and see if i can push 200 pony's out of the little guy. any advice would be great thanks!

-Boss III
to build up the bottom end of a 7A you will need custom pistons and either custom rods or the rods that Pauter makes. 7aftes can make 200or so hp on stock internals if boosted and tuned properly but after that its hopes and dreams if you dont build up the bottom end (which gets pretty expensive).

-Brian
Yeah. so its pretty much done.

We took some off the intake things back off just to paint them since they looked like crap compared to the valve cover. we also took the cast part of the oil pan back off to get drilled and tapped for my oil return line. then when thats done I'll just plug up the hole and we'll put the oil pan back on and put oil in it and it'll be ready to go in.

Having asked many different opinions I've decided to go with this plan for now unless persuaded otherwise...
Swap in the engine, no turbo setup. run it for 500 miles on regular oil then drain, change the filter and re-fill with Mobil 1 full synthetic. 3,000 miles later change the oil and filter and install the turbo setup. change the oil every 5,000 miles thereafter.

7A-FTE:It's not about the money.Our Beams Swap.I <3 Dustin---07/16/06
sounds like a good plan, though i wouldn't see any issue putting the turbo on now, and running low boost levels
well 8 out of 10 people tell me to break it in without the turbo first and the rest say it really doesn't matter either way. The main reason I brought up doing it all at once was so I wouldn't have to take up Manny's garage for two separate weekends but he says its ok and I should break it in non-turbo so I'll go with that.


The final parts bill is paid !! The oil filter and spark plugs I already had. I still want to get a fuel filter, maybe spark plug wires too. I'm also going to get fluids from work; Oil, Toyota Long Life Coolant, I think thats all I'm going to have to remove. Synchromesh from Autozone, I'm told its better than the OEM stuff.

Total came to $527.62

IPB Image

IPB Image

IPB Image


7A-FTE:It's not about the money.Our Beams Swap.I <3 Dustin---07/16/06
^baller!

15PSI - 30MPG - Megasquirt Tuned
!!!!!!!!!!!!!!! $110 list price on piston rings? i paid that much for new pistons and rings. (granted they werent marked as toyota)

Lookin good so far Steff thumbsup.gif

-Brian
Thats all for the rebuild itself. Anything else that will be done to this motor will be for the turbo setup so it'll be in my 7AFTE Tech/Project thread.

Right now I'm at about 193,520 miles on my original engine. I'm going to try and push it to 200,000 before putting in the "new" rebuilt engine. I'll eventually put up some pictures of the install and final product after we get it in.

7A-FTE:It's not about the money.Our Beams Swap.I <3 Dustin---07/16/06
Hi Stef, I noticed that you said you're planning on using synchromesh in your post. I used it in mine with no improvement. I was having trouble shifting into first, and it turned out it was the clutch. When I had the clutch replaced by my new mechanic, he mentioned that I should never use synchromesh in this transmission. I know this can be a polarizing issue, but he said that it's not meant for the brass synchros that are used in Toyota trannies. He said it sometimes helps a tranny that's on it's last legs, but it's designed for use in a different vehicle. Instead he swears by Redline MT90 75W90. I'm inclined to believe the guys since he only works on MR2s and Celicas, but so do the guys you work with. Anyways, just thought I'd share that.
>
QUOTE(94GT @ Nov 3, 2007 - 11:02 PM) [snapback]610954[/snapback]
>
I know this can be a polarizing issue


haha, yeah (maybe making it more so)

Nice rebuild you have goin on..

I replaced my gear oil with synchromesh and my shifting got noticeably easier.

This is off pennzoil's website "[...] compatibility with yellow metals, such as bronze, brass and copper components found in manual transaxles and transmissions."

I've always heard that the synchromesh was meant for those yellow metals, but of course that just what i heard
>
QUOTE(94GT @ Nov 4, 2007 - 1:02 AM) [snapback]610954[/snapback]
>
Hi Stef, I noticed that you said you're planning on using synchromesh in your post. I used it in mine with no improvement. I was having trouble shifting into first, and it turned out it was the clutch. When I had the clutch replaced by my new mechanic, he mentioned that I should never use synchromesh in this transmission. I know this can be a polarizing issue, but he said that it's not meant for the brass synchros that are used in Toyota trannies. He said it sometimes helps a tranny that's on it's last legs, but it's designed for use in a different vehicle. Instead he swears by Redline MT90 75W90. I'm inclined to believe the guys since he only works on MR2s and Celicas, but so do the guys you work with. Anyways, just thought I'd share that.


Well, C-52 transmissions are notorious for having bad 2nd and 3rd gear synchros. The later year models have better synchros in them. This is the problem most people run across. They just keep changing the gear oil to cover it up.

:.....Flush Wheel Fitment Guide.....:
Some things to add to the parts list:

Spark plug wires
Distributor cap/rotor

Axle seals
Fuel filter
Drive belts
Starter (only since I don't think mine has ever been changed)
Radiator (still debating. it is also the original radiator and getting stress cracks)

Toyota Long Life Coolant
Synchromech transmission fluid
5w-30 Regular Castrol Motor Oil (for brake-in period only. then switch to Mobil1 Full Synthetic)

7A-FTE:It's not about the money.Our Beams Swap.I <3 Dustin---07/16/06
UPDATE: my current engine (at 195,300) isn't going to make it much longer without major surgery. It's almost time to put in the new one.

- Its getting very expensive/useless/annoying having to put in 3-4 qts of oil every 7-10 days.
- My oil pressure is going crazy and making no sense. It's very high and doesn't get low when the oil is low, it actually goes higher. Its a little scary when the max pressure is 71 and mine goes up to about 80 when there's only like 1qt left.
- I think its leaking from the seals behind the timing cover and my timing belt is swimming in oil.
- There are too many problems and when I try to band-aid one I worsen the others. Ex. I started using 20w-50 to lessen the massive oil burning but [in Dustin's theory] it clogged everything causing the higher oil pressure and probably causing some parts of the engine to not receive oil at all. However, if I put a thinner oil in it'll just leak out and burn off the cylinders and smoke like crazy.

I just can't win. It's getting very discouraging and I am very tired of it at this point.

This post has been edited by hurley97: Nov 28, 2007 - 8:00 PM

7A-FTE:It's not about the money.Our Beams Swap.I <3 Dustin---07/16/06
Stop stressing steph and throw that new engine in!!! thumbsup.gif

Darin H.
In preparation for the swap I bought a few more things. I mentioned some above... fuel filter, axle seals, drive belts, coolant, dist cap, rotor, wires, the power steering line crush washer in case we need to disconnect it, and a remanufactured starter. I also bought a new (aftermarket) radiator for $134 from 1800Radiator and had it delivered to work the same day.

IPB Image

This post has been edited by hurley97: Nov 30, 2007 - 6:33 PM

7A-FTE:It's not about the money.Our Beams Swap.I <3 Dustin---07/16/06
good job steff!
we'll get that thing in and get the break in process over so we can BOOOST it!!!

Former Team 5SFTE pro member ;)13.6@108MPH, 5SFTE Powered