Over 1M Posts • 84K Topics • 9K Authors

My Engine Bay Renovation Thread - 6G Celicas Forums

Topic #44927 405 posts Started by Coomer
>
QUOTE(doGGy @ Mar 16, 2007 - 2:22 PM) [snapback]536924[/snapback]
>
Just another hint Chris - if you want to make sure everything is smooth and there are no sanding marks / dings / imperfections - use a Control layer biggrin.gif Just take black or red ratle can (nitro paint) and spray over the sandible area a little mist of the paint. After this - start sanding - paint will stay in all the inperfections and it will be 10X easyer to see where and how much you need to sand smile.gif I ussualy use this method all over the sanding jobs, even then sanding the last layer with 1000 grit - its really good to see how everything is turning out.

LOL I did that when I painted my motorcycle fairings and it works like a charm. The prep work was perfect, and so the paintjob. That is a great technique. It was my first time doing bodywork and painting and it came out perfect in every way. biggrin.gif

Past -7A-FTE: Will never forget youPresent -3rd Gen3S-GTE: Swap in progressQUOTE (SinisterSinner @ Dec 19, 2009 - 10:52 AM)I dont want to even think of turbos, they blow up way too often...
Thanks for the tips guys.

I haven't been very productive the last few days...I've been at home, but I've just been going through some hard times and haven't had the motivation to put a lot of work into the car. kindasad.gif

But I did get some stuff done. I painted the block and installed the alternator and timing belt covers. I also cleaned the tranny off so it's clean.

Attached Image

There's the tranny...nice and clean. smile.gif

Attached Image

And the motor, all painted and kind of cleaned up.

Attached Image

There's the backside of the motor...I didn't bother cleaning much of it up because it will never be seen once it's in the car.

Tomorrow I get my wisdom teeth taken out, so I'll be out of commission for a few days. Hopefully soon I'll get the bay painted and continue working though. smile.gif

New Toyota project coming soon...
Today was a very good day...I woke up at five with no pain from my wisdom teeth being pulled yesterday, so I headed to Yakima to get some work done.

I first fabricated a battery tray for the front of my car. It'll hold the battery in the area where the windshield washer fluid reservoir used to sit. I have no photos though, as I removed the battery and then proceeded to the John Deere dealer to get some paint for the bay. smile.gif

Once I was back, I finished up sanding the bay and masked off garage.

Attached Image

I didn't want yellow overspray on the workbench, motor, rest of the car, etc. Once masking was done, I wiped everything clean and shot some Duplicolor rattle can primer sealer.

Attached Image

Looking much better in primer already. thumbsup.gif 
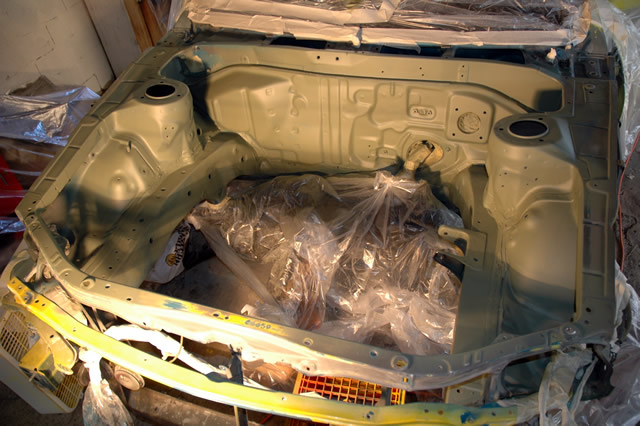
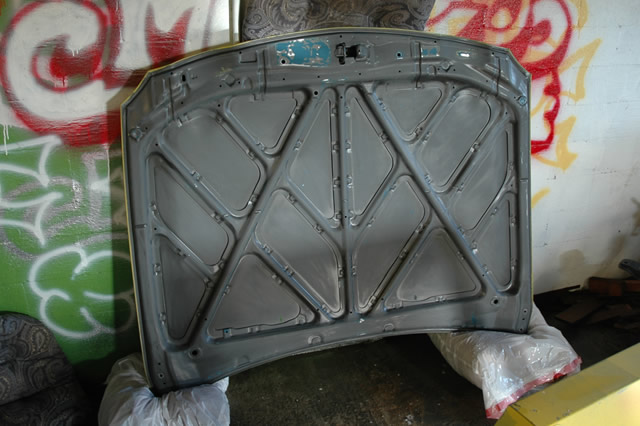
I then proceeded to sand down the underside of the hood.

Attached Image

Not a fun job at all, but there it is all sanded down.

Then it was time for paint. smile.gif

Attached Image

There's the hood, all painted. It needs some wetsanding and buffing, but otherwise looks good. smile.gif

Attached Image

Attached Image

Attached Image

And there is the bay, all one color and looking good. I'm very happy with how the paint turned out. I'm going to let it all dry for a few days and then proceed to putting it back together. smile.gif

New Toyota project coming soon...
wow youve been keeping busy, that looks much better than before. but i still think thats a lot of yellow tongue.gif

I think Bigfoot is blurry, that's the problem. It's not the photographer's fault. Bigfoot is blurry. And that's extra scary to me, because there's a large, out-of-focus monster roaming the countryside.
Thanks...I agree that it's a lot of yellow, but I think it'll look good once it's done. smile.gif

I've got a couple questions.

1. Can I mount my brake booster upside down? I like the placement of the brake booster line fitting more when it's inverted.

2. For my brake booster line, can I run a soft line all the way to the intake manifold? I don't want to run the hard line across the firewall.

New Toyota project coming soon...
Coomer that is amazing looking! big round of applause for tackling that, looks superb!

Visit My Automotive & Tech Blog.
soft line should be fine its just vaccum line... as for upside down hrmm i'm not sure..


what are you using/how are you painting btw?
>
QUOTE(x_itchy_b_x @ Mar 21, 2007 - 8:33 AM) [snapback]538350[/snapback]
>
Coomer that is amazing looking! big round of applause for tackling that, looks superb!


Thanks...too bad it won't be fast like your build though. wink.gif

>
QUOTE(playr158 @ Mar 21, 2007 - 10:02 AM) [snapback]538377[/snapback]
>
soft line should be fine its just vaccum line... as for upside down hrmm i'm not sure..


what are you using/how are you painting btw?


I'm using the John Deere paint again. 10 parts paint to 1.5 parts thinner, and 10 parts paint to 1 part synthetic enamel hardener. I painted using my eBay special HVLP gravity feed spray gun. smile.gif

New Toyota project coming soon...
ok, i need to eventually do what your doing and don't really understand frown.gif

very inspirational you are smile.gif
>
QUOTE(Coomer @ Mar 21, 2007 - 9:20 AM) [snapback]538346[/snapback]
>
Thanks...I agree that it's a lot of yellow, but I think it'll look good once it's done. smile.gif

I've got a couple questions.

1. Can I mount my brake booster upside down? I like the placement of the brake booster line fitting more when it's inverted.

2. For my brake booster line, can I run a soft line all the way to the intake manifold? I don't want to run the hard line across the firewall.


1. No.
2. Yes - get the hidrolic line witch can hold good pressure - and you will be set biggrin.gif I did this way on my LHD conversion.

Ex celica owner - just a guy from other side of the pond...Full custom Projects from restoration to performance builds<<<<<< DCw / JDMart >>>>>>>
>
QUOTE(playr158 @ Mar 21, 2007 - 10:31 AM) [snapback]538385[/snapback]
>
ok, i need to eventually do what your doing and don't really understand frown.gif


Which part don't you understand? I'll try to clear it up as best as I can. smile.gif

And thanks for the answers Romas. smile.gif

New Toyota project coming soon...
oh lol sorry my wording should have been better..

i don't understand the painting process as a whole...

what you said was clear thumbsup.gif

This post has been edited by playr158: Mar 21, 2007 - 2:43 PM
>
QUOTE(playr158 @ Mar 21, 2007 - 12:43 PM) [snapback]538404[/snapback]
>
oh lol sorry my wording should have been better..

i don't understand the painting process as a whole...

what you said was clear thumbsup.gif


It's really not too bad...wash, degrease, sand (and sand, and sand, then sand some more), degrease, prime (can be optional), sand, degrease, then paint. Then you can wetsand and buff. Also, I did bodywork (filling dings and stuff) after I wetsanded everything, because you don't want body filler getting wet.

This thread details my painting process, and I learned a lot just reading online, especially at Autobody 101.

New Toyota project coming soon...
good stuff coomer.. looks awesome thumbsup.gif thumbsup.gif

AoL: Socom Twill.....MySpace.....KeepLookin Custom Carz<<<<<
Today I installed the brake booster and master cylinders, and installed most of my brake lines.

Attached Image

Attached Image

There's how the new setup looks...much better than before in my opinion. smile.gif

Attached Image

On the crossmember, you can see where I mounted the proportioning valve and T-fitting.

Attached Image

The tools I used for cutting, flaring, and bending brake lines.

Attached Image

Here's a helpful tip if you're ever bending your own brake lines. Find some wire, and then you can cut and bend it into place before working with the actual tubing. This saved me a lot of time.

I'm about to pass out, so if parts of this don't make sense, that's why. wink.gif

New Toyota project coming soon...
Thats coming along very well. I wish I could do this with my car.
Thanks for all the details. thumbsup.gif

I will return one day.
thats looking AWESOME coomer, its coming along very nicely
you are very talented...where did you learn how to do all of this, it seems there is nothing you cant do, automotive wise.
keep up the great work smile.gif
awesome job coomer. your going to have a show ready car when its all done.

15PSI - 30MPG - Megasquirt Tuned
Thanks for the comments guys. smile.gif

Today was a really good day...I worked on the site for about six hours this morning and then went home and got a fair amount done on the car.

Attached Image

I got the final brake line, the passenger side front one, done. I had it looking better than this one, and then realized that I'd forgotten to put the fitting on, so I had to throw that piece out. frown.gif I think this one looks decent though.

Attached Image

I also installed my Russell stainless brake lines on all four corners. They seem to fit pretty well and they look nice. They should give me a better pedal feel once the car is on the road. smile.gif

Once all the brake lines were hooked up and tightened, I put some fluid in the master cylinder and proceeded to get fluid flowing through the lines to make sure I don't have any leaks anywhere. I had a tiny leak right at the master cylinder, but tightening the fitting another third of a turn solved that. I'll bleed the brakes when someone is actually home to help me and then I'll check for leaks again.

Attached Image

I also finished up my steering setup. What I did was cut the two stock hard lines, then I attached reinforced vinyl tubing to them, which go to a T-fitting. The small part of the T-fitting then goes to a small clutch fluid reservoir that I found sitting at the junkyard...I don't even know what kind of car it came from.

Why go with a setup like this you may ask? Well, I no longer will have power steering, so this solution should make steering much easier than it was before with no power steering (when I just had the belt off.) ATF cannot compress (at least not very much), so with the power steering pump not spinning on the old setup, the system is full of fluid, but it cannot flow very easily at all, because the fluid must spin the pump.

With this setup, there is no pump in the way, so the fluid will flow through just fine. There will be a minimal amount of ATF in the system, and the reservoir isn't for holding fluid, but to allow air in the system to compress and escape if necessary, as the reservoir is not airtight. A lot of the Honda guys run setups similar to this and say it helps a ton compared to just removing the belt that spins the power steering pump. I can't wait to drive the car and see how everything feels.

And I'll leave you guys with a little teaser pic. biggrin.gif

Attached Image

New Toyota project coming soon...
amazing work chris.
major props.
how many hrs you figure you got into that bay???
hit your local autozone or whatever and pick up a "mightyvac"
it will make all your bleeding (clutch, brakes..) a one man job.
cant wait to hear your thoughts on those AGX's!!

Former Team 5SFTE pro member ;)13.6@108MPH, 5SFTE Powered
looking good coom. The engine bay is gonna look rediculus when its all finished. Also, thouse Russel brake lines are awsome. Ive been runnin em on my car for 6 months now and i love em.
BTW: the mario mushroom wrist band/brake resevoir cover = awsome..lol
every time i check this thread, i get blown away twice as much as the previous one. This is truly amazing work, i wish i just had the time to do this to my car. This is one celica that i will travel thousands of miles to see in person one day. Great work, keep it up and keep us posted as usual. And also, i think i caught a glimpse of an adjustable shock residing within you shock towers. thumbsup.gif thumbsup.gif

1994 GT Hatchback1994 ST Coupe1988 Corolla Wagon All-Trac1999 Corvette2008 Cobalt SS Turbo
coomer for featured ride! your car is So clean. i love it!

Visit My Automotive & Tech Blog.
IPB Image


you know we want details on how you got them to work on the celi.

how stiff are we setting the up ?
first the mega body work thread now the engine bay renovation thread, you are a madman coomer, truly an inspiration.

i still remember reading all the painful threads about your swap, cops hassling you, and the for sale threads, the break in, its awesome to see you and your celi still together and you putting us all to shame with your ambition. make us all look lazy!
Thanks for the comments guys...makes me want to go home and work on it some more. biggrin.gif

As far as how I got the AGXs to work, it required a fair amount of fabrication. I've got a how-to prepared and will put it online once I get my car back on the road and ensure that the AGXs actually work.

I just ordered my fuel filter from EverythingG20 (I'm going to be using an OEM G20 fuel filter). I'm going to attempt to order a 100-amp, switchable, panel-mount Bussman circuit breaker here in town, since I can't find one online anywhere.

I'm also preparing my order from Summit for some parts. I'm getting remote battery terminals, parts to make my own stainless steel braided clutch line, and maybe some fuel line stuff...I'd like to run a stainless braided fuel line from the intake manifold to the fuel filter. I've just got a couple questions.

1. Does anyone know the size of the bolt hole on the the 4A-GE's intake manifold where the bolt that holds the banjo fitting and line is? I'm guessing 12mm x 1.25, but I'm not sure.

2. Does anyone know if anyone sells stainless braided fuel lines that have an open sort of end on one end so that I can clamp that end to my fuel filter?

New Toyota project coming soon...
Simply amazing. and I second itchy's demand for the yelli celi as featured ride!
>
QUOTE(Coomer @ Mar 25, 2007 - 1:35 PM) [snapback]539653[/snapback]
>
1. Does anyone know the size of the bolt hole on the the 4A-GE's intake manifold where the bolt that holds the banjo fitting and line is? I'm guessing 12mm x 1.25, but I'm not sure.

2. Does anyone know if anyone sells stainless braided fuel lines that have an open sort of end on one end so that I can clamp that end to my fuel filter?


1. check with club4age. there should b some one on the site that should know.

2. I would say see if russel has somethin. I think that they have open ends at the end that you could put a barbed filter on, or have a fitting that you could attach to a barbed fitting like on the fuel filter.
>
QUOTE(Valo666 @ Mar 25, 2007 - 2:57 PM) [snapback]539688[/snapback]
>
>
QUOTE(Coomer @ Mar 25, 2007 - 1:35 PM) [snapback]539653[/snapback]
>
1. Does anyone know the size of the bolt hole on the the 4A-GE's intake manifold where the bolt that holds the banjo fitting and line is? I'm guessing 12mm x 1.25, but I'm not sure.

2. Does anyone know if anyone sells stainless braided fuel lines that have an open sort of end on one end so that I can clamp that end to my fuel filter?


1. check with club4age. there should b some one on the site that should know.


Looking good Coomer, I am amazed at the progress.

The 4age forums have been down for a while. I can pull mine and measure
it if you need me to I don't know if the 16v is the same though.

JDM guy made me do it.
I just had a great idea as I was preparing to order my stuff for my clutch line. biggrin.gif

I think I'm going to run a hard line from the slave cylinder down the front of the transmission and under it, to a small stainless line, and then to a hard line which goes to the master cylinder. It's a longer path, but I don't see any real disadvantages to it.

That, or I'm thinking of just running a blingin' stainless line all the way from the slave cylinder to the lower firewall, where it'll meet with a hard line and then the master cylinder.

I can't decide between having nothing running over the tranny, or a very nice looking stainless line with anodized fittings. Decisions, decisions... smile.gif

I also cannot decide where I want to put the fuel filter. It needs to be reasonably accessible, but I don't want it to be too visible. I'm thinking lower firewall, or on the driver's side frame rail under the brake master cylinder. Anyone have any other suggestions?

Edit: Valo,
I did find a fitting that would work. Russell part number, 663010, which is $5.95 from Summit Racing. It's a -6AN male fitting on one end with a 1/4" tube on the other for attaching a 3/8" hose to. So I could have the stainless line, then that fitting, then a small fuel line hose, then my fuel filter.

Randy,
That's alright...you don't need to measure for me...I'll just check next time I go home...I need to measure some things before I order anything anyway. smile.gif

This post has been edited by Coomer: Mar 25, 2007 - 5:09 PM

New Toyota project coming soon...